Ready Seat Belt

レディー・シート・ベルト

A look into the cool and bizarre, focusing on the Japanese import car culture and delicious ramen. Updated weekly.

  • Home
  • Blog
  • Food
  • Archive
    • Complete Archive
    • Ramen Archive & Map
    • Suzuki Alto Works HA11S
    • Suzuki Alto Works HA12S (Scrapped)
    • Suzuki Swift Sport ZC31S (Sold)
    • Suzuki Wagon R MC22 (Scrapped)
    • Newbie Guide
    • Photography
  • About
  • Facebook
  • Instagram
  • Twitter
2018-12-14 006.JPG

[ Alto Works ] Christmas Shaken

February 26, 2019 by William Tjipto in Cars, Japan, Ownership, Project Sachiel

Christmas brings presents, cheer, Starbucks Pistachio Christmas Tree lattes, and, for my precious little Alto Works, dreaded shaken. As mentioned previously, shaken needs to be done on all actively operating cars in Japan. As with most cars and my little Alto, it needs to be performed every two years to ensure proper operation. My shaken was due on December 25th, Christmas Day. I wonder if one of the previous owners, years ago, bought himself this car as a present?

Part of the shaken process involves going to the local city hall and paying a “recycling fee” for the car. This is a huge chunk of the shaken cost and rises with the car’s age. For me, it came out to around 25,000¥ ($230 USD).

The next thing I had to do was bring the car to as stock as possible. Surprisingly, according to my mechanic, the engine bay with my HKS Filter, heat shields, and oil catch can would be acceptable to leave as-is. My Nardi steering wheel, rear pillar bar are acceptable, as well. However, the East Bear Sports bucket seat and wheel spacers would all have to be brought back to stock and removed because they violate the rather strict shaken rules for one reason or another: The stock seat needs to be used for safety and the wheels must be within the fender width. (With the spacers, the spokes on my Volk wheels were just past the fender by a few millimeters.)

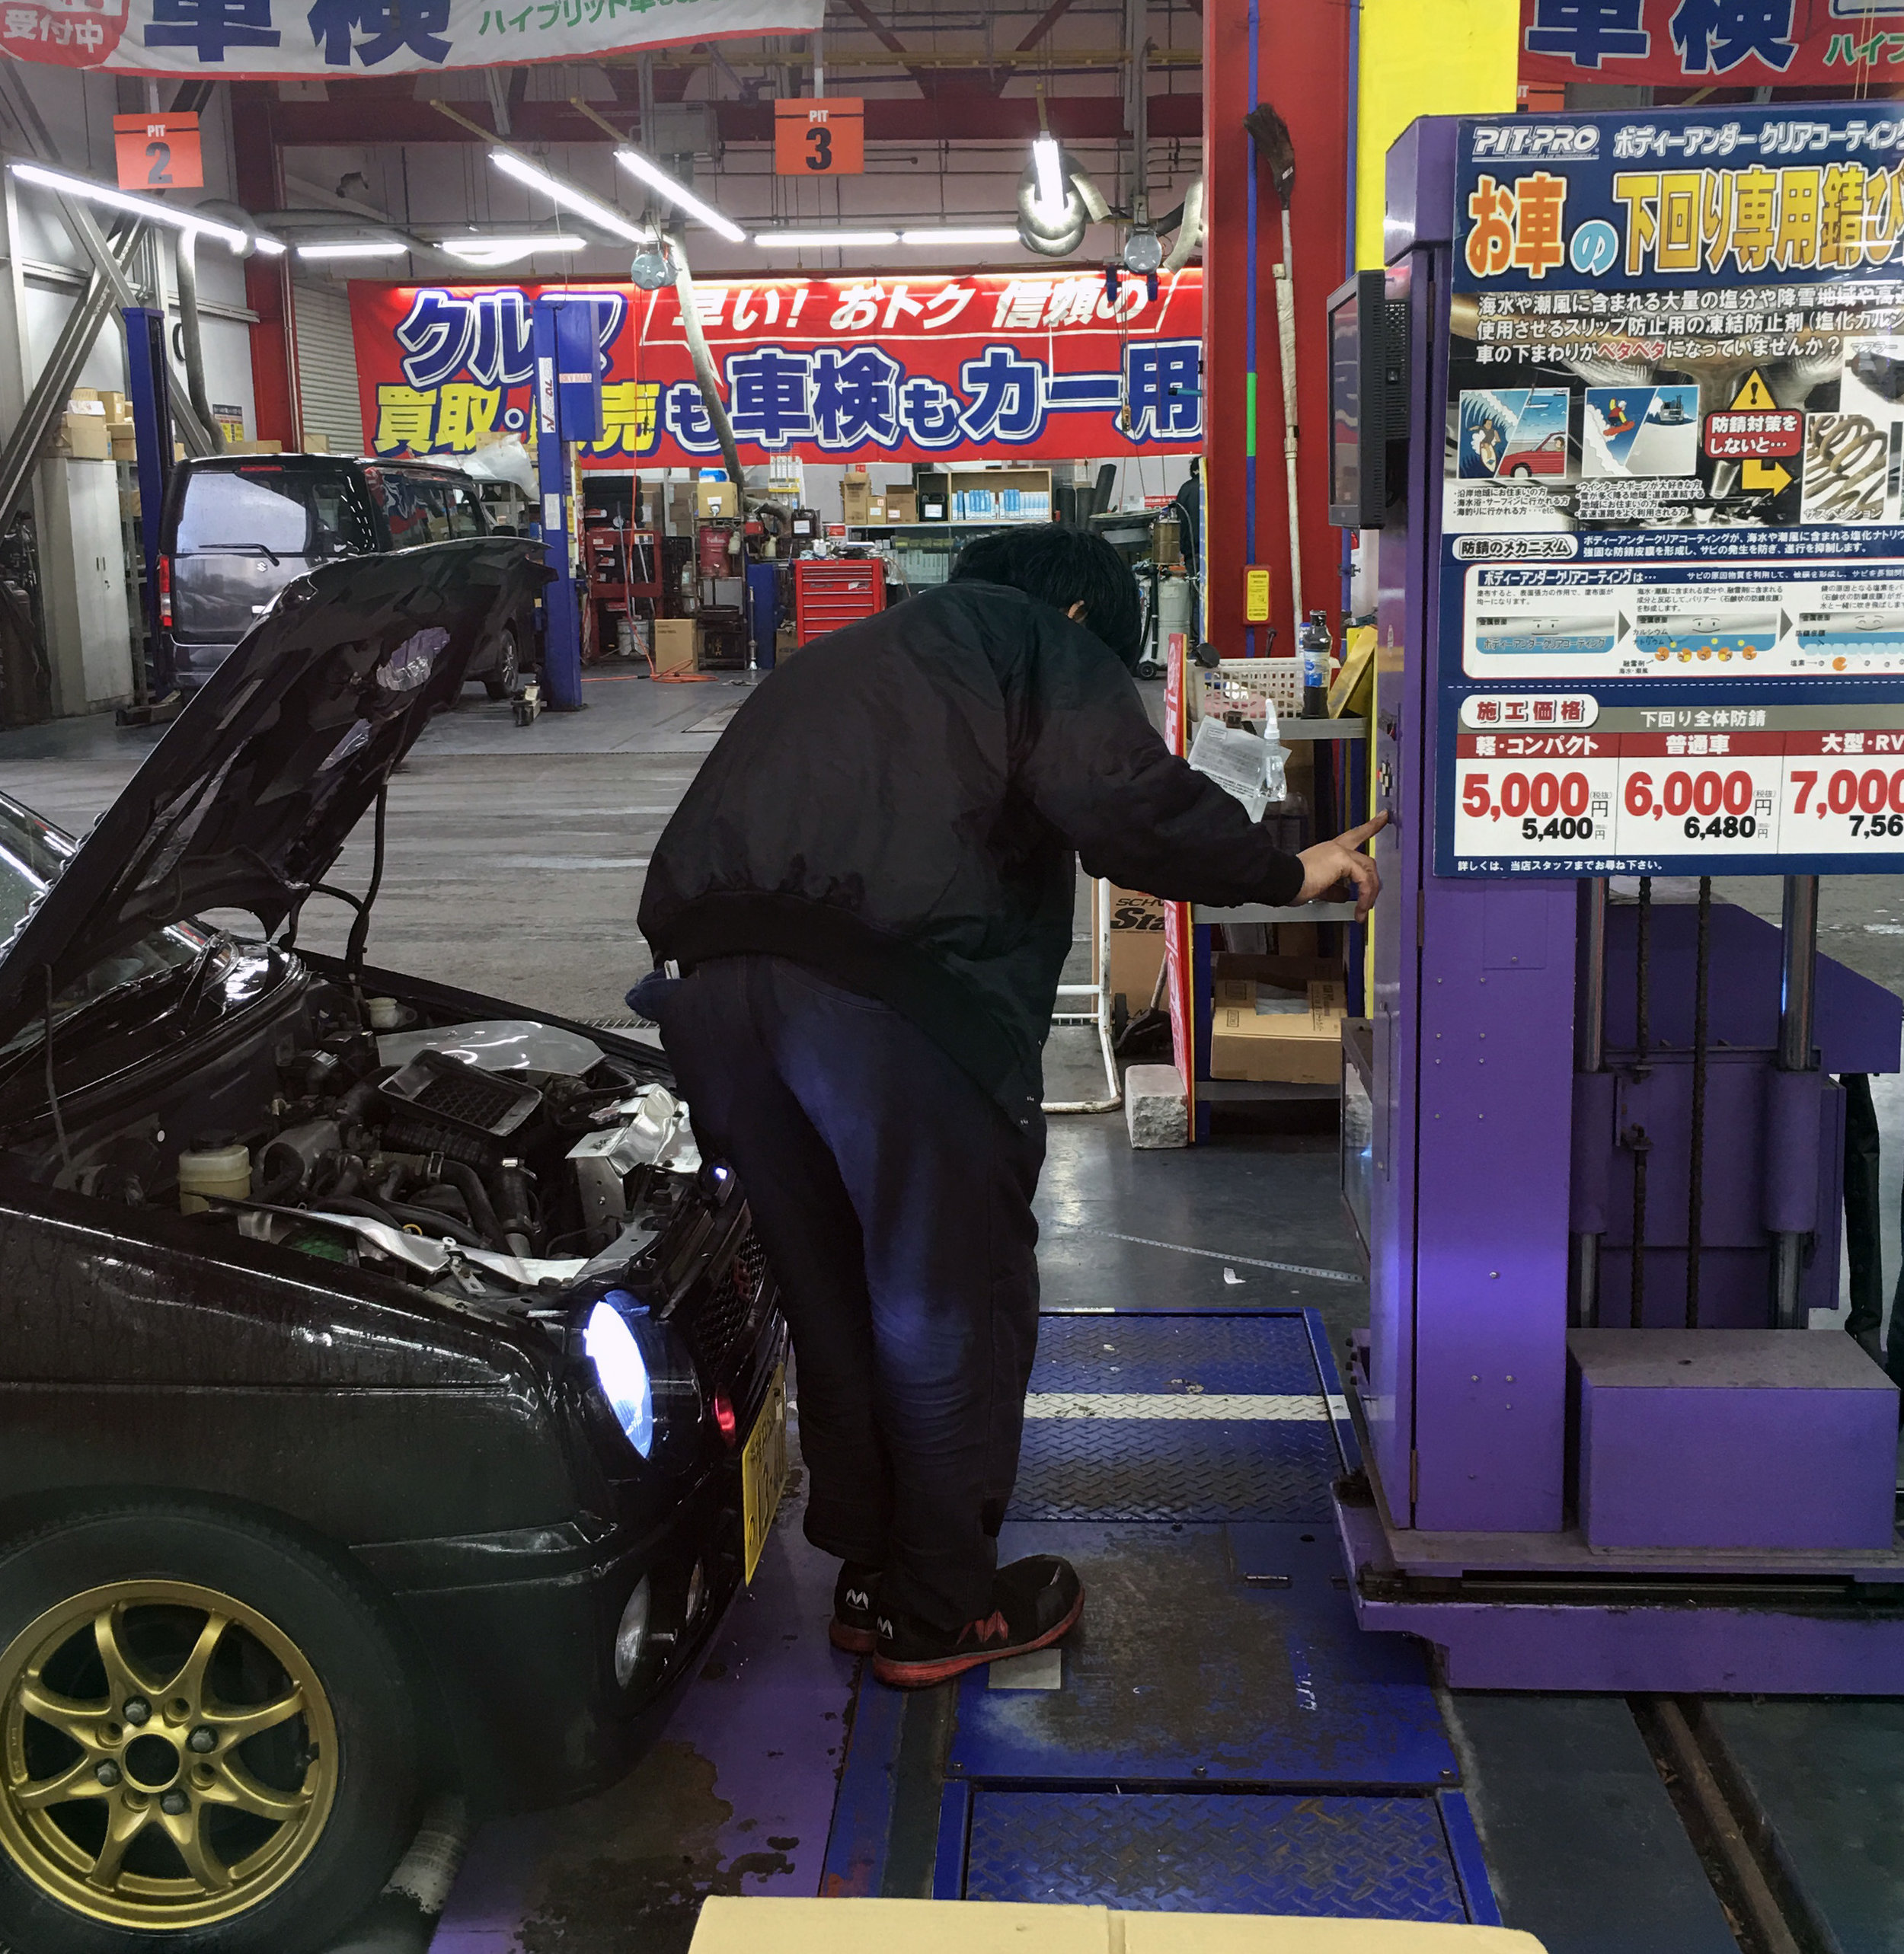
After putting the two parts back to stock, I took some time off on a Friday to head up to Sabae City with my friend Matsuda-san from Rodeo Cars. The first stop was Autobacs. (Autobacs is the Japanese equivalent to Pep Boys or Autozone in the states, but way better.) There, I needed to perform two labor jobs: an alignment and a headlight level adjustment. The alignment would be to ensure the wheels don’t have too much of a negative camber and the headlight check is to ensure the beams are pointed in the right direction; not too high, not too low, not off to the side.

2018-12-07 006.JPG

Autobacs
The alignment was 3000¥ and 1000¥ for the headlights. Once paid, the mechanic drove it on the rollers and began to mess with the headlights. A few minutes later, he started work on the alignment… and that’s when we ran into serious problems. He drove it off the rollers on to a lift and tried to adjust my suspension as much as possible. Alas, after 20 minutes, he came up to talk with us and tell us the bad news that the car would not pass shaken because there was too much negative camber. He said the headlights would probably pass, but offered no vote of confidence either way.

Sadly, this means I had to bring my Sport-Service front suspension back to stock, as well. Turns out my 1.5 hour drive to Fukui City would bear no shaken fruit this day. That following weekend, I replaced my front suspension back to stock and had it re-realigned at a (pricier) place in my town.

Driving up again on the following Friday, I once again had to stop by Autobacs for another adjustment of my headlights since the ride height of the car changed since last time. Once again, the mechanic suggested that it may pass. My friend suggested we give it a shot anyway.

2018-12-14 016.JPG

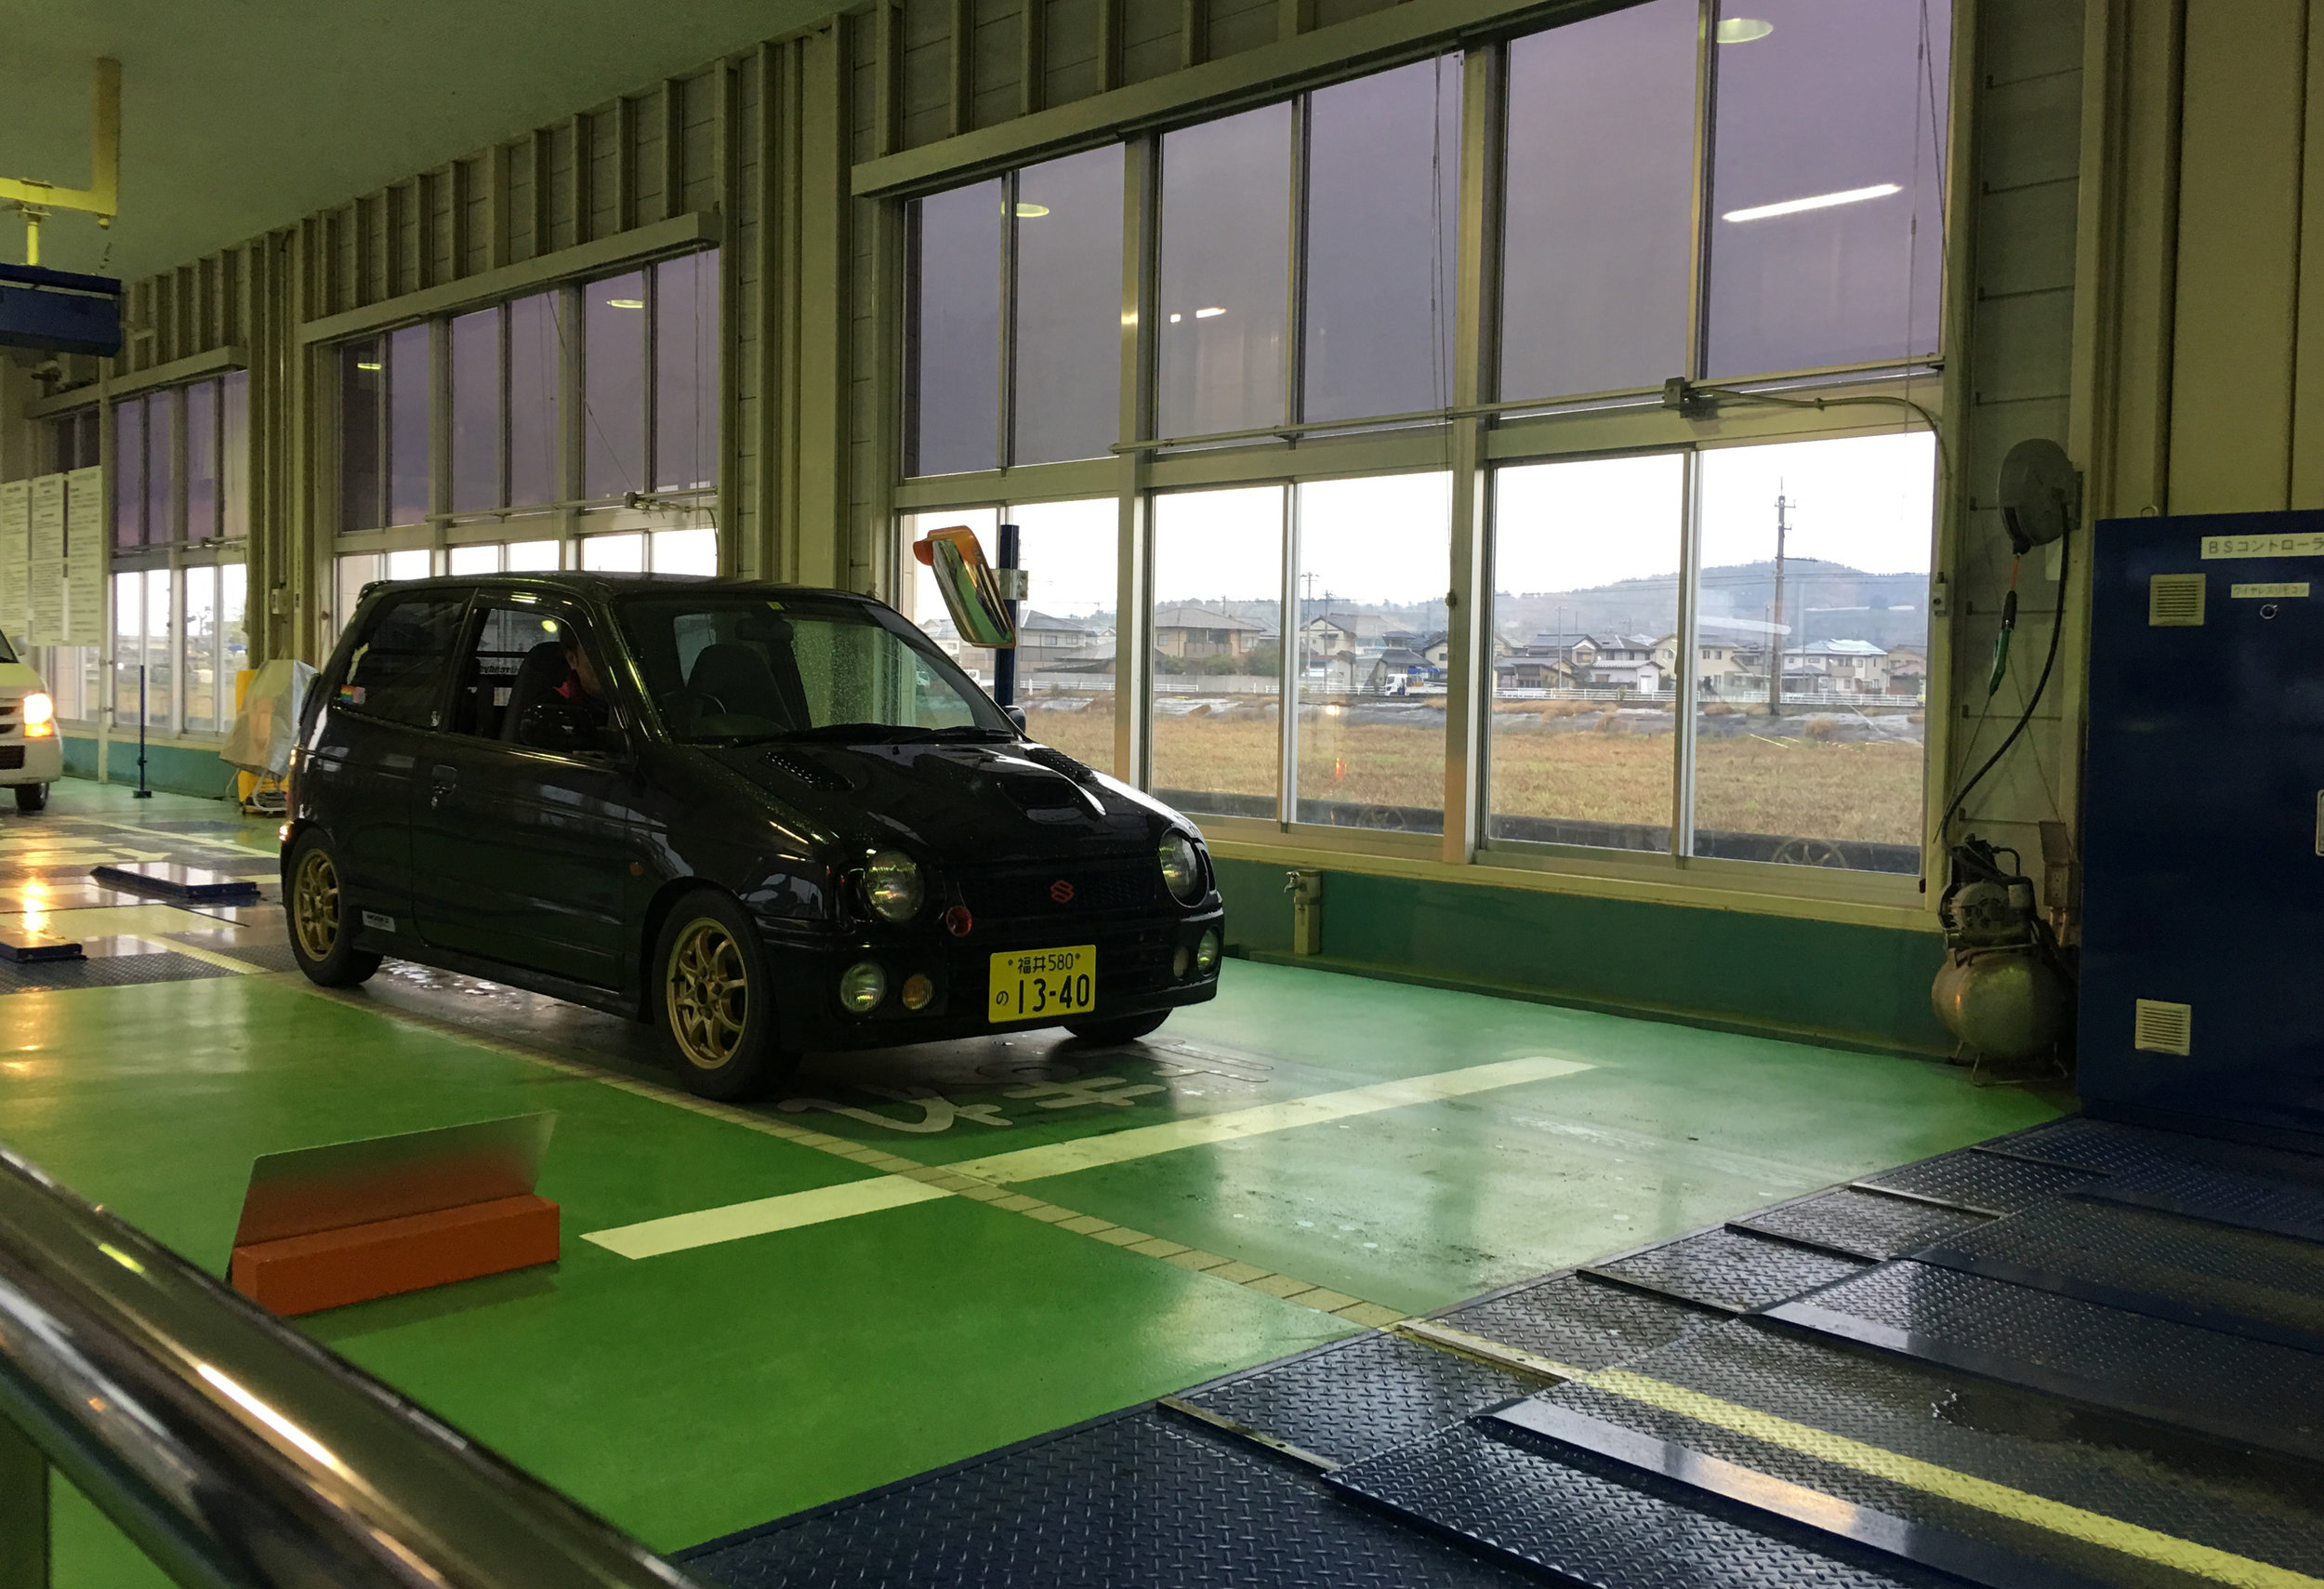
Arriving at the Kei Car Automotive Association Center a few kilometers away, we first had to pay for a tax fee based on the car class, for me totalling around 8800¥. Then the wait in a short procession of cars for the inspection. A nervousness came over me, as there are a few modifications to the car I felt would not pass muster. Rolled fenders, hood vents, oil catch can, cut rear bumper, front intake snorkel… I heard about how strict shaken was and that brought dread. Would this end up another wasted weekday?

2018-12-14 031.JPG

The first stage was visual inspection. Ride height, general body condition, engine bay, wiper function, and paperwork were checked here. As expected, I was questioned about the front intake snorkel. My mechanic insisted it was for looks only and that it did not directly connect with the air intake. (Which is true… it merely leads to the intake.) Surprisingly, the hood vents, the heat shields, HKS filter, and oil catch can did not bother them in the slightest. No other comments were made about my bumper or fenders, thankfully.

2018-12-14 033.JPG

In the next stage, the car is driven onto rollers. Here, the car is checked for alignment, acceleration, brakes, and parking brakes. My car passed with flying colors, but then came the headlight machine which checks the brightness, spread, and aim of the headlights. Almost immediately, the screen above spat out an “X.” Universal, really, for fail.

A “mini boss” showed up here at this point, confronting me about my exhaust sound. I’d like to say the overeager young lad here annoyed me greatly. (Having already been disheartened by the failed headlight check.) The decibel sound, to me, is very obviously within the sound tolerance limits; I’d argue that some stock exhausts sound louder than this does. But it was his prerogative to challenge it and so he called on his manager to double check the sound just by listening to it. One sharp rev and the manager didn’t even blink and passed me. Thank you, good sir, for being reasonable.

2018-12-14 028.JPG

The final stage of this shaken process involves a lift and visual inspection. My car is in overall great condition, with little rust, so this stage was a breeze. No issues were detected and I breathed a sigh of relief… the front suspension is riding on partially cut springs, afterall.

The time was now 3:30PM and the facility closes at 4:00. This gave us a few minutes to attempt another run through. Luckily, I brought a set of stockish, blue-tinted halogen H4 bulbs that were on my car initially. We rushed to replace the HIDs with these bulbs, reaching behind the small space behind the headlights. No time for cleaning up wires and putting the rubber gaskets back on, we tried again.

The staff once again questioned the front intake snorkel. (They literally saw us not 15 minutes ago!) They weren’t sure the bulbs would pass, but allowed us to check the headlights anyway...

And it was so close. The last boss was proving difficult to defeat, as the right headlight failed by a few degrees. Apparently, according to the aforementioned young lad, it needs to be pointing up just a bit. He said if we were quick, we could do one final run-through. It was past 3:50 at this point...

For the final check, the staff let us pass through visual and roller check. Once I heard the ding and saw the “O” “O” for the headlight check, I nearly cheered out loud. That was, as the Japanese say, “girigiri,” as in “just barely.”

2018-12-23 011.JPG

I received the victory medal, a slip of paper and a freshly minted shaken decal. This would proudly go on my car the next day. Other than you readers, probably few others know of the struggle I had to obtain it. First world problems, I know.

To my recollection, this is the breakdown of all the costs associated with my shaken on my 1998 Alto Works. Your prefecture and car will vary.
Car weight tax stamp fee 8800¥
Examination fee 1400¥
Recycle fee 25000¥
Headlight adjustment fee 1080¥
Alignment adjustment fee 3000¥ to 4000¥
Delivering to Fukui ~4000¥ > 8000¥
Fluids change 5000¥ (This will vary greatly, since I am more or less “sponsored” by my mechanic.)

DSC00295.jpg

As for the parts I pulled off it, did I end up putting them all back on?

February 26, 2019 /William Tjipto
NEWBIE, GUIDE, NEWBIEGUIDE, CAR, 車, 軽自動車, BUYING, JAPAN, 日本, 車検, SHAKEN, ADVICE, INSPECTION, JDM, SUZUKI, ALTO, ALTO WORKS, HA11S, KEI CAR, CAR LIFE, F6A, RHD, スズキ, アルト, アルトワークス, 自動車, RAYS, レイズ, VOLK RACING, VR, RSR
Cars, Japan, Ownership, Project Sachiel
3 Comments
DSC00242.JPG

[ Alto Works ] Sport-Service RSR Basic Coilover Suspension

January 22, 2019 by William Tjipto in Cars, Japan, Ownership, Project Sachiel

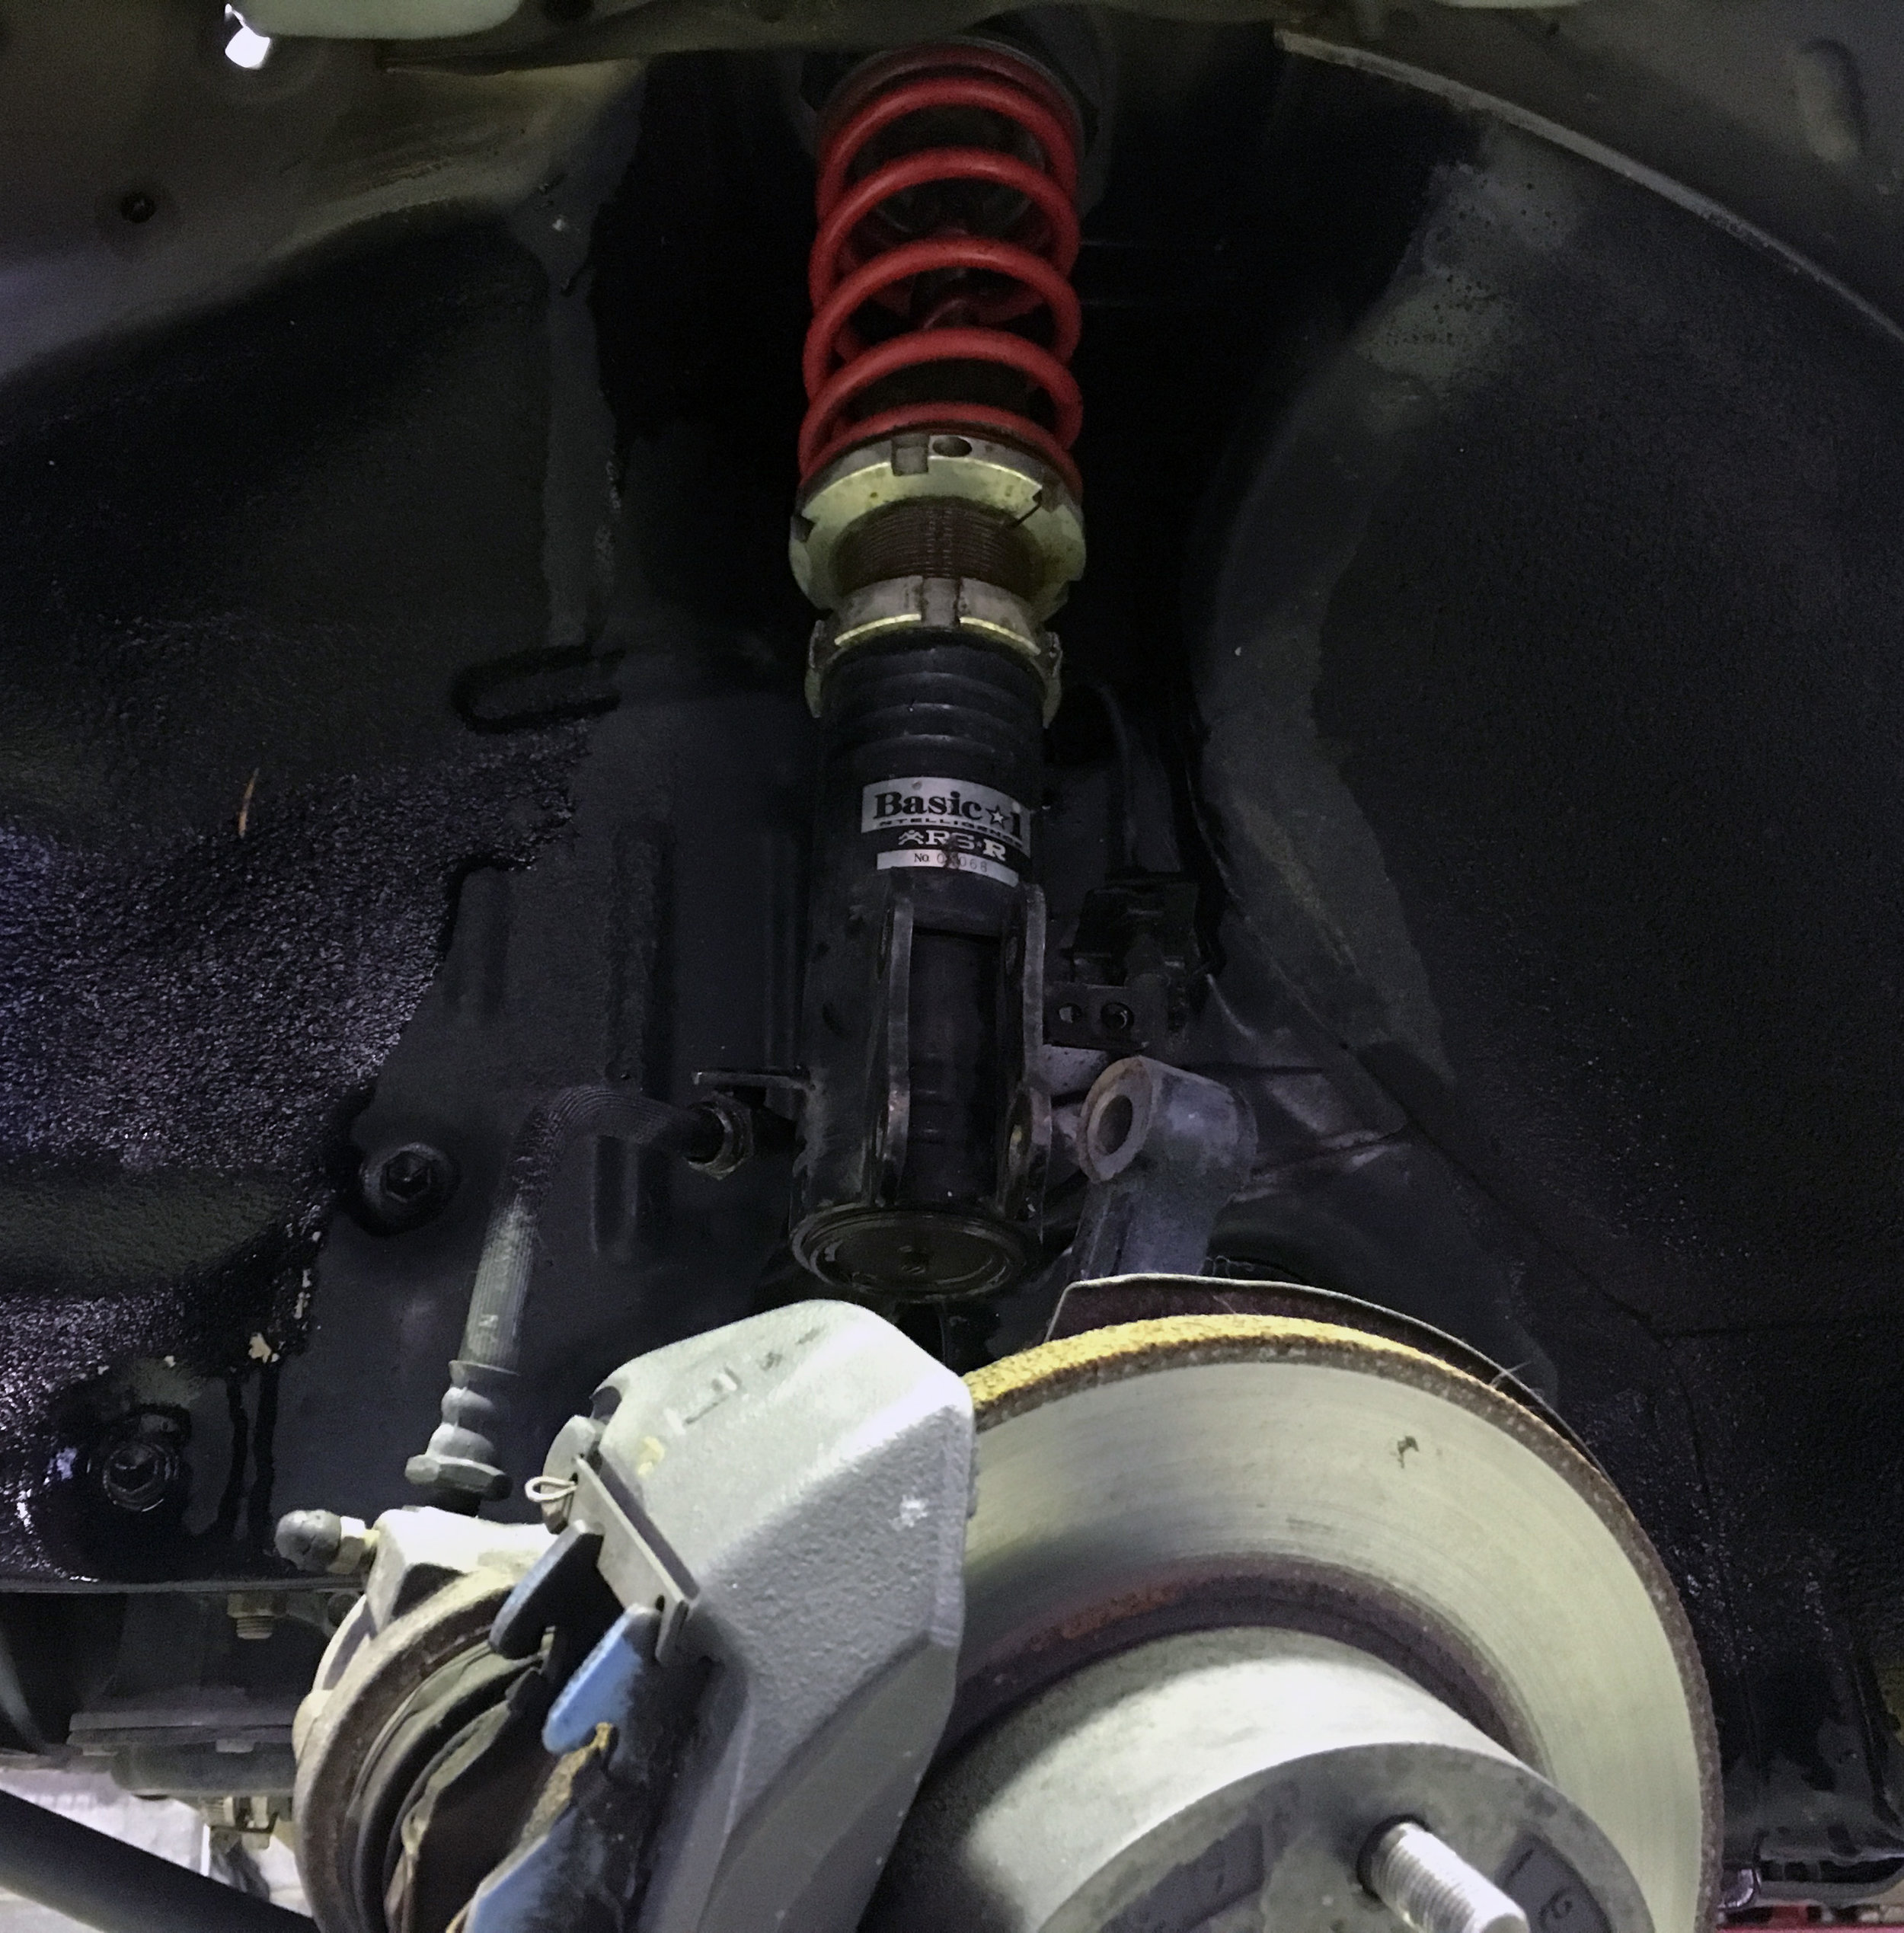
I am always looking to improve my car as simply and cheaply as possible. With my shaken due this past month in December, I have to replace the cut springs, as they are a “no-no” for the mandatory inspection (well, if it was discovered). And my mechanic is a strict guy so he highly recommended I change the suspension beforehand. Luckily my prayers for cheap, used parts came in the form of my friend who owned a 2003 Wagon R. As mentioned some months ago, we pulled off some Sport-Service RSR Basic Coilovers off his car when he brought it back to stock in order to sell it off. He offered it to me for a steal, so I couldn’t say no. Who knows if it could fit my older 1998 Alto, which is obviously a completely different body style, not to mention ride height? Would the suspension mount points fit or would it be too high compared to the smaller Alto?

My friend and I had this belief for some time that there is a huge number of parts sharing going on between the same manufacturer of kei cars. Suzuki, being arguably the leader in kei car sales, especially during that late 90s / early 2000s period, was prolifically producing a huge range of kei cars with minor cosmetic differences. With so much money that goes into R&D and tooling, it only made sense to change as little as possible to keep production costs low and share parts across their lineup.

2018-11-16 025.JPG

With that, I decided to try it out myself. The easiest part to access and replace would be the rear springs of the car, so started off with that. Lifting the car up, I can easily see that the rear springs and shocks are extremely similar in size with exactly the same mounting hole sizes, though the RSR shock tube width is a bit thicker.

2018-11-17 013.JPG

Let’s just say the top perch is absolutely a two-second drop-in fit, fitting snugly in the top rubber mount. We pulled it out for a quick cleanup and installed it, along with the two-second drop-in fit of the rear springs.

2018-11-17 014.JPG

It’s times like these I am so happy to have access to a lift, since dropping the car down, checking height, and readjusting as needed is a quick and painless procedure. After a few tries, we got the car at a very reasonable height for the upcoming shaken and for driving around town in the winter. This set the adjustable ring o the perch at about nearly two-thirds down the length of the body, affording plenty of lowering in the future.

2018-12-22 003.JPG

However, with the slightly wider coil diameter of the springs, the RSR shocks would definitely not be able to replace the stock Alto shocks without bumping or rubbing against the springs. As it sits now, its somewhat close, but definitely not an issue now. So unfortunately, the RSR rear shocks will have to collect dust somewhere, unused.

2018-12-09 012.JPG

Moving on to the front, we could immediately notice incredible similarities between the two front suspension struts. Kei car front suspensions are wonderfully easy to remove. With only two lower bolts, two upper hat nuts, and a clip for the brake hose, swapping the struts was a pleasant task. (Plus with all that experience I got from cutting the springs and fitting them, I was quite well versed.) Literally ten minutes later, both struts were installed and final tightening adjustments were made. The one very minor difference between the two struts were the brake hose attachment points.

2018-12-09 010.JPG

We lowered the car and… voila! A perfect ride height and a near perfect fit. I was surprised that no ride height adjustment was needed, since Wagon Rs typically rides higher than Altos. (My friend’s Wagon R was nearly slammed to the ground, I guess.)

DSC_2691.JPG

As a bonus, there is noticeable negative camber on the front wheels now. This camber should aid a bit in hard cornering, as when the car’s weight in thrown into one of these front wheels, more of the tire is flat on the ground, increasing grip. Conversely, when the car has neutral camber as it did before, the geometry change when weight is applied in the corner will decrease grip with positive camber. This is especially important in a front-driven car with a majority of the weight riding on its front wheels.

Not that I have particularly noticed it yet. Driving on winter tires in the cold winter really does not show the capabilities of the new suspension setup, but I will say the car is feeling a lot stiffer on bumps, but with a much more controlled bounce than the haphazardly cut suspension previously. The on-center feel is much lighter than before and the car is eager to turn. As I get more experience with it, I’ll update my review on it later.

DSC_2688.JPG

Of course, the most important benefit of all this suspension change is that the car is looking more gorgeous than ever before. Maybe driving around this winter won’t be so terrible, after all.

January 22, 2019 /William Tjipto
JAPAN, JDM, SUZUKI, ALTO, ALTO WORKS, HA11S, CAR, KEI CAR, CAR LIFE, F6A, RHD, スズキ, アルト, アルトワークス, 自動車, 軽自動車, 日本, 車, RAYS, レイズ, VOLK RACING, VR, rsr
Cars, Japan, Ownership, Project Sachiel
2 Comments
2018-11-17 019.JPG

[ Alto Works ] Volk Racing GR-N Wheel Restoration

November 23, 2018 by William Tjipto in Cars, Japan, Ownership, Project Sachiel
2018-06-21 005.JPG

I recently picked up a set of RAYS Volk Racing GR-N Wheels in a 13x4.5 +43 size for an amazing price… check this out… 12460¥ ($113 USD), shipped, off of Yahoo! Auctions. Effing genuine, forged RAYS Engineering, period-correct wheels in the absolute perfect kei car size for barely over $100 USD. That, my friends, is ridiculous. I’ve said Japan is a parts heaven before and I’ll state that again, unequivocally. To be fair, they are tiny, kei car-sized and not a particularly aggressive offset, at that. But as my planned winter set to replace my current ugly, but painted, steel wheels, they will suit that role quite well.

I knew when I bought them online they would be a bit shabby, have some paint corrosion, and have some curbing, but as long as they are round and not dented or cracked, I’m not worried; that is the most important aspect. When it arrived, I’ll admit I was quite surprised at the rough condition, a bit of spiderwebs, and… a new spider friend, who sadly, I quickly dispatched. Thanks, seller, you could’ve at least taken off the webs and spider before you shipped them off?

2018-06-21 008.JPG

Yes, these are genuine wheels. Rays Engineering is stamped in the front and all four still have their original sizing sticker affixed to their backside. All made in Japan in 1992, the heyday of JDM kei car popularity, with the ABCs of kei cars.

2018-06-21 009.JPG

Here are the wheels after a really brief spray down to remove the spider webs and loose dirt. The paint corrosion is fairly significant. As you can see from these dirty wheels, that there is a lot of paint bubbling and peeling. Although extremely sun faded, it is evident that the wheels were once gold at some distant point in their history. (Also included are the center caps, but those I’ll have to repair and install separately.) Thankfully they are round and the actual lips have little to no curbing at  the lip. Surprising, for such old wheels. But the spokes do stick out a bit, hence a little curbing along the spoke faces.

2018-06-26 003.JPG

First step, let’s get off all the rough stuff, shall we? At least the wheels didn’t come with tires, as that these following steps would be a lot more... tiresome. Heh heh heh.

2018-06-26 004.JPG

The first step in this process is a bit of elbow grease and a lot of 100 grit mesh sandpaper. I first chipped away at any major peeling paint, removing major spots that I need to be aware of when I start sanding. And there was a lot of sanding.

2018-08-19 001.JPG

Ok, not too bad at all. The corrosion doesn’t seem to go deeply into the metal and remains only at the surface, eating at the paint. As long as I can smooth the surface and prevent further deterioration, the surface as it looks now will hopefully be mostly blended in when the paint comes.

After just the first two wheels, I really wish I had a media blaster to strip off the paint much easier. This is definitely taking a lot longer than I anticipated, given all the spokes and varying surfaces of the wheels. This one wheel alone took a little more than 2 hours to get to this stage. Thankfully, I started at the worst wheel, so it should theoretically get easier from here.

After much deliberation between gunmetal, gold, and bronze, I settled on returning the wheels back to a shade of gold they once were a long time ago. I’ll see how it looks after the first layer if I’m gonna stick with my choice.

The wheels were scuffed up with all the sanding I’ve done, allowing paint to adhere. However, to promote a stronger bond, I first layered the wheels with a few thin coats of primer. Using primer improves the ability for the outer layers of paint to stick and adhere much better. I typically don’t use primer in most of my previous painting jobs, as it isn’t necessary in all situations and for all materials, but I figure since these are quality wheels, they deserve better treatment.

2018-10-14 001.JPG

After several hours of coats and re-coats, the first two wheels were painted. Looking at the finish again, there are several areas where the areas of chipped paint aren’t as smooth as I had hoped. You can see the border between “edge” of the original paint and the metal of the wheel distinctly in some of these shots. While it isn’t terrible, it’s far from perfect.

2018-10-14 004.JPG

A few layers of gloss clear paint will really make the gold pop with a nice, deep shine. If only I had some replacement Volk Racing decals, it would look like-new again. But, alas, at 500¥ a piece, I couldn’t quite justify them since they look great now without them.

2018-11-16 003.JPG

Time to move the rubber over from my winter set. Yeah, these Nexen Winguard tires might not be exactly the best performing winter tires, they will suffice for driving around town. I’m quite lucky that I live in an area where snowfall isn’t typically heavy, we usually only get a few inches of the fluff every year, so traversing through heavy winter ice or slush isn’t much of an issue.

2018-11-16 004.JPG
Balancing is a delicate task.

Balancing is a delicate task.

With the help of my mechanic and the local gas station, we got the tires peeled off the steel wheels and the tires mounted over and balanced on the new wheels.

2018-11-16 021.JPG

GORGEOUS.

2018-11-17 034.JPG

Overall, I am quite pleased with the deal I got for the wheels. Unfortunately I had to spend about 3000¥ ($27 USD) in sanding materials and paint and the end product was not quite as great as I had hoped. Like the rest of the car, it looks nice at 20 feet away, but not great at 10. It will do as a winter set for now, but the next time I unmount these tires, I will redo the finish again.

2018-11-17 051.JPG

Let’s hope these forged wheels will last another 26 years of use.

November 23, 2018 /William Tjipto
JAPAN, JDM, SUZUKI, ALTO, ALTO WORKS, HA11S, CAR, KEI CAR, CAR LIFE, F6A, RHD, スズキ, アルト, アルトワークス, 自動車, 軽自動車, 日本, 車, RAYS, レイズ, Volk Racing, VR
Cars, Japan, Ownership, Project Sachiel
2 Comments

Powered by Squarespace