Ready Seat Belt

レディー・シート・ベルト

A look into the cool and bizarre, focusing on the Japanese import car culture and delicious ramen. Updated weekly.

  • Home
  • Blog
  • Food
  • Archive
    • Complete Archive
    • Ramen Archive & Map
    • Suzuki Alto Works HA11S
    • Suzuki Alto Works HA12S (Scrapped)
    • Suzuki Swift Sport ZC31S (Sold)
    • Suzuki Wagon R MC22 (Scrapped)
    • Newbie Guide
    • Photography
  • About
  • Facebook
  • Instagram
  • Twitter
2018-04-20 015.JPG

[ Alto Works ] D-1 Spec Oil Catch Can Modification

June 14, 2018 by William Tjipto in Cars, Japan, Ownership, Project Sachiel

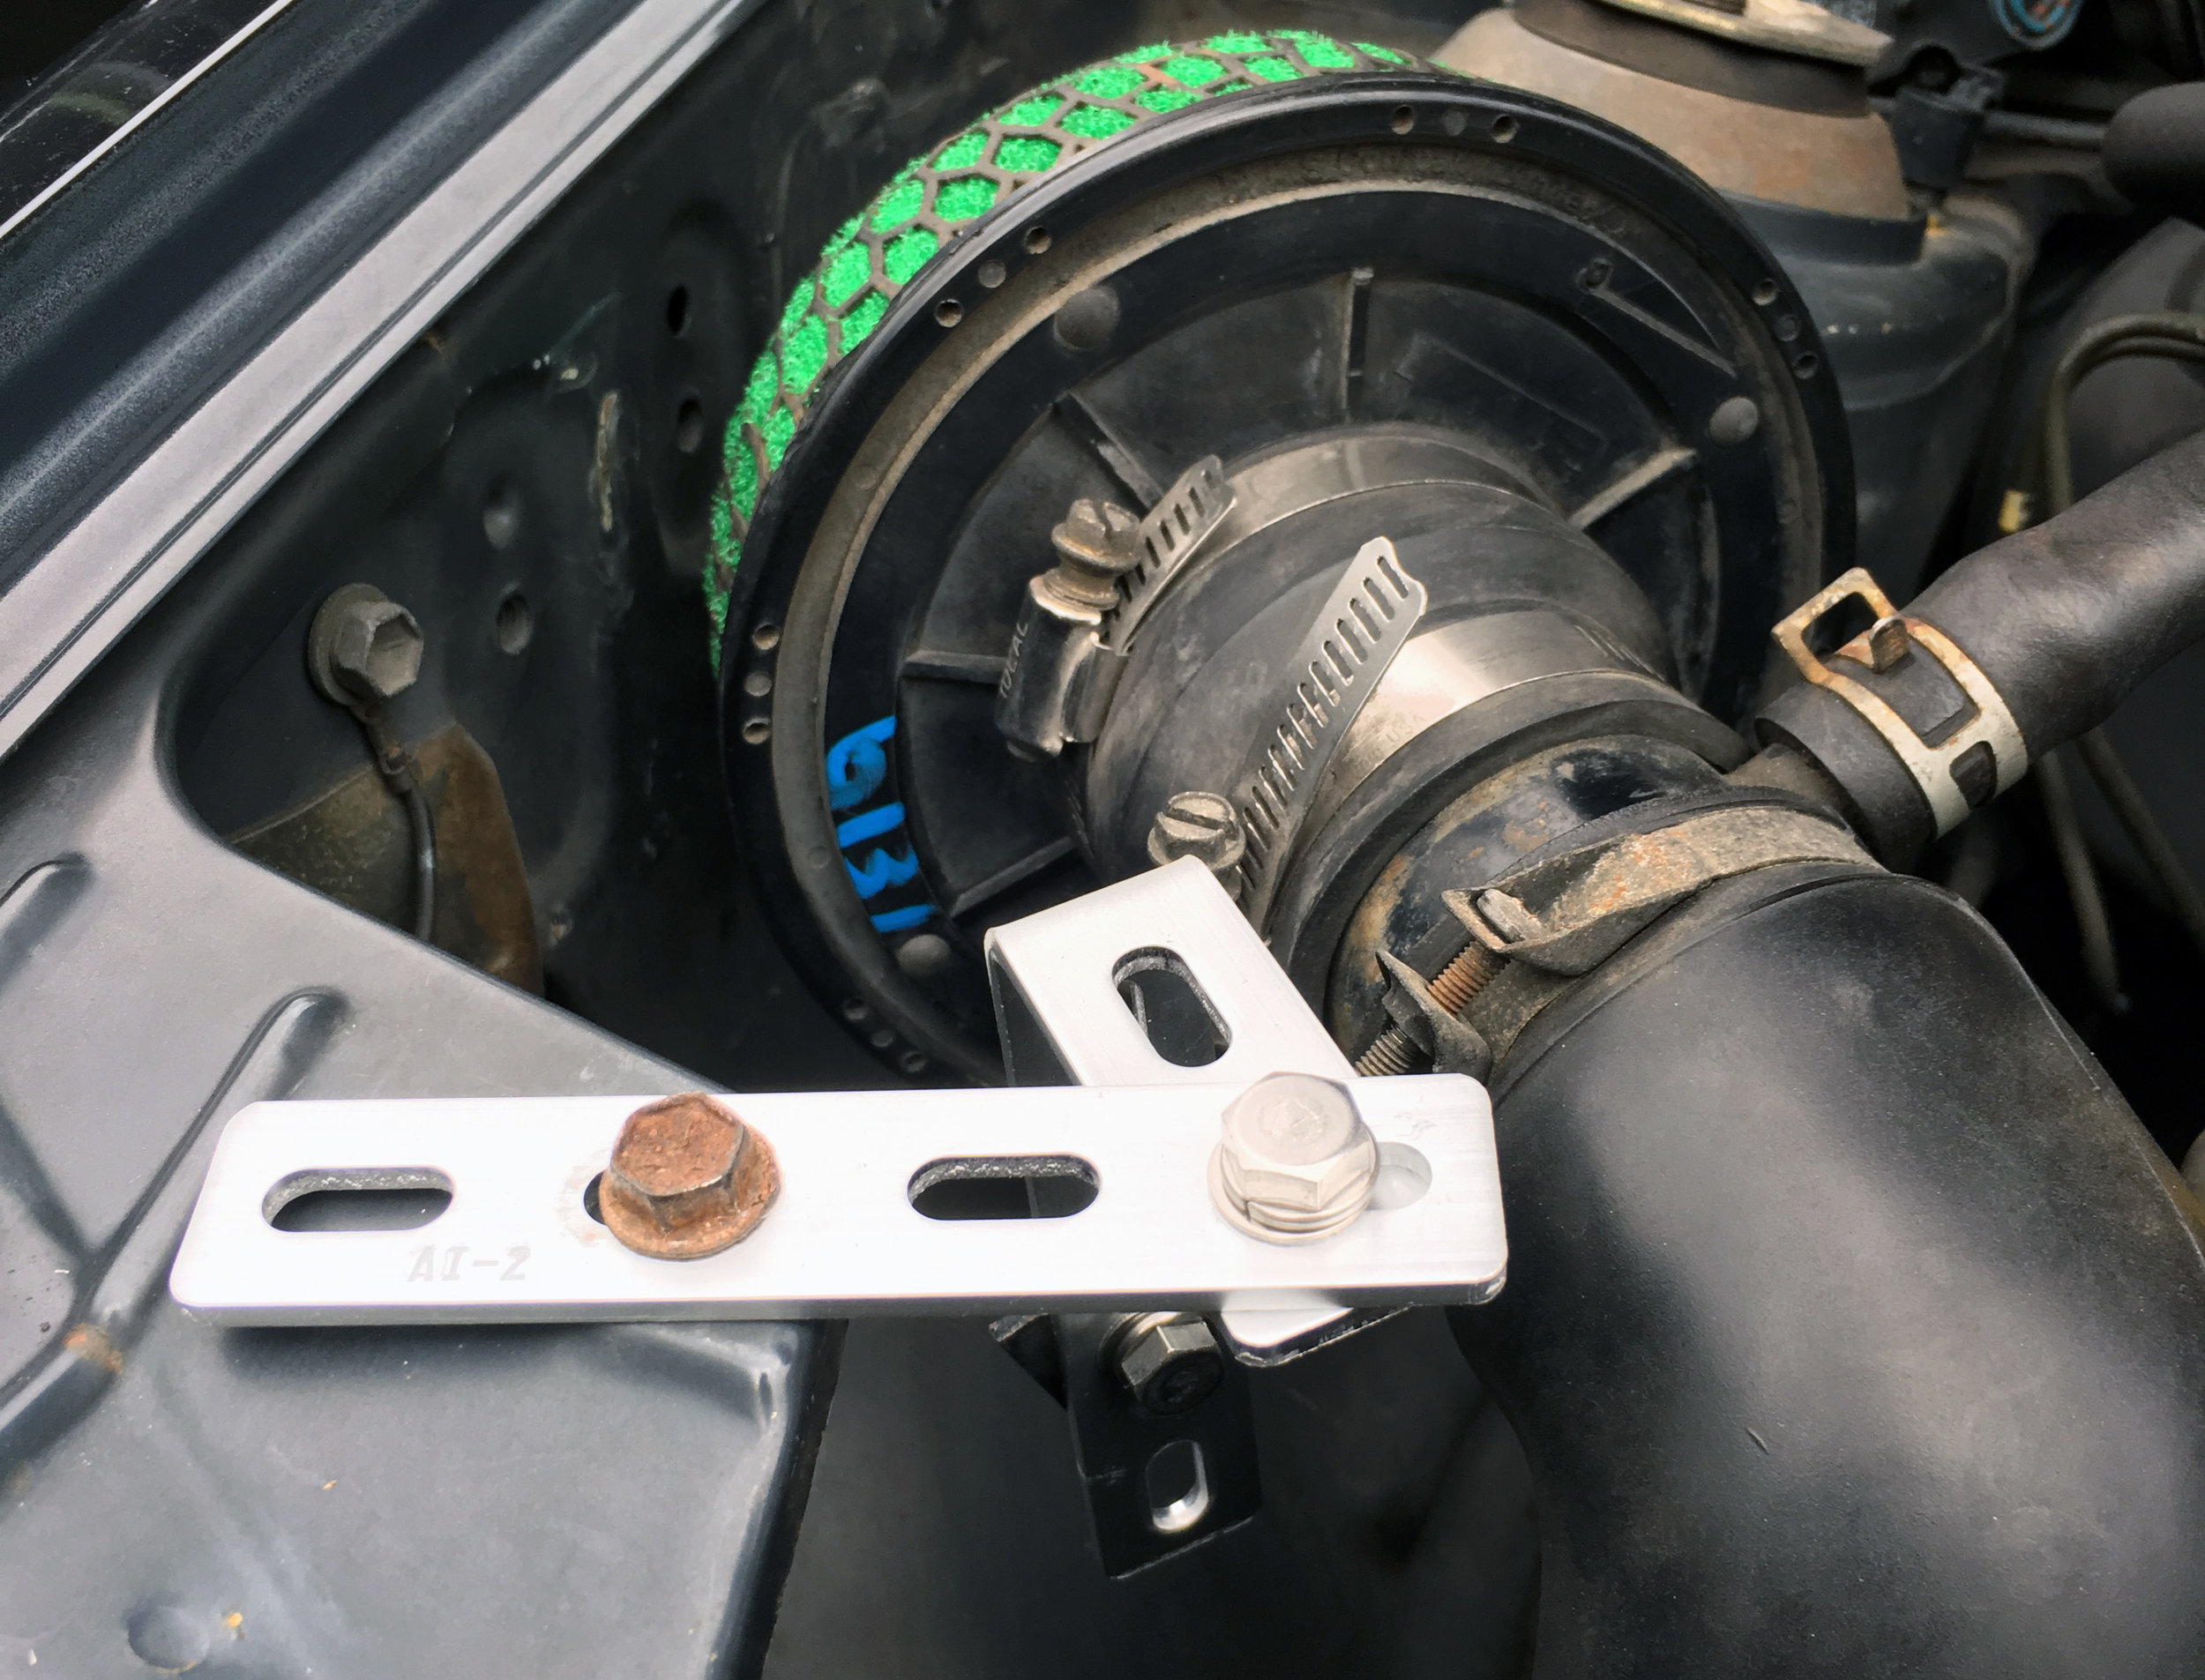
High-mileage turbo’d cars are dirty. Piston rings are old and worn, so they might have quite a bit of blow-by, which means compression losses and lower power. But it also means oil in the air is recirculated back from the engine by the dump valve into the intake. In a naturally-aspirated engine, it’s usually not a problem as it is burned off fairly cleanly, though in a turbo engine, it can build up throughout the intercooler, piping, and intake manifold, severely affecting performance. Sadly, my high-mileage Alto probably has a bit of it already, judging by the inside of some of the piping. Until I need to replace these, I installed a oil catch can in the meantime to help prevent further buildup.

2018-04-18 003.JPG

I picked up this new D-1 Spec oil catch can for a mere 2400¥ ($22 USD), so I didn’t expect much. Construction seems pretty solid and there are no burrs or any strange issues with molding that I could see. It’s definitely a lot larger than I expected; I’d have been happy with half the size. Sadly, for the price, there is no internal baffling unlike higher end products. I had to make do with some large wire, stainless steel scrubbers. Hopefully it doesn’t fall apart and end up in my intake.

2018-04-22 047.JPG

This oil catch can is a cheap product, so I expected cheap performance, for sure. I installed it in the only empty space in the crowded engine bay, near the brake booster, the right strut, and intake. Luckily, that’s where it needs to be, anyway. It’s hard to see at the moment, but you can see how I used some aluminum brackets to make a mount for it.

2018-04-22 048.JPG

After a long weekend trip running the car, I found that there was a bit of oily grease along the walls of the can. Good to know its working to some degree so far, catching some of the excess oil from being recirculated back into the intake. This was definitely a worthwhile preventative modification.

June 14, 2018 /William Tjipto
JAPAN, JDM, SUZUKI, ALTO, ALTO WORKS, HA11S, CAR, KEI CAR, CAR LIFE, F6A, RHD, スズキ, アルト, アルトワークス, 自動車, 軽自動車, 日本, 車
Cars, Japan, Ownership, Project Sachiel
Comment
2018-04-15 005.JPG

[ Alto Works ] HKS Super Power Flow

June 05, 2018 by William Tjipto in Cars, Japan, Ownership, Project Sachiel
IMG_0425.JPG

Turbo cars can benefit greatly with a well-designed aftermarket air intake, as the stock intake can be, on some cars, a bit restrictive and can limit the additional amount of air necessary for high boost pressures. A higher flow filter, directed to draw air from cooler areas of the engine bay or directly from the front, can help improve power at higher RPMs.

2017-10-07 004.JPG

However, there can be several drawbacks with aftermarket intakes, even the best designed ones. Noise is increased, unshielded filters can draw in hot air near the exhaust manifold, and exposed filters can draw in more debris or potentially water. Also importantly, engine tuning can be negatively affected, as the proper balance of air, fuel, and timing is absolutely critical.

Simply dropping in a cone filter does not necessarily improve performance. Many unknowing car owners pull out the stock intake piping, drop in a cone filter, and call it “good.” Stock intakes are designed a certain way for a reason; sometimes extra piping and large, empty Helmholtz chambers are needed and the location of air snorkels are well engineered. Moreover, the Mass Air Flow sensor is placed a certain distance away from the intake throttle body to properly measure air, but sadly, I’ve seen under enough hoods to realize not everyone knows this.

IMG_3281.JPG

In California and some states in America, the replacement intake must also be certified CARB legal, so options are limited. In Japan, virtually any reasonable intake can be installed and still pass Japanese inspection. Knowing the potential drawbacks of installing an aftermarket intake, I figure the potential benefits still outweigh them and so all my cars have aftermarket intakes installed at the moment, all from highly reputable manufacturers.

2018-04-14 027.JPG

Upon inspecting the original intake and filter, I found that it seems actually quite well designed as it is. The intake is piped in from just behind the right headlight, potentially drawing in plenty of fresh air, though sadly the intake piping is slightly small in diameter and has too many sharp bends, potentially decreasing airflow speed and pressure.

2018-04-14 032.JPG

The filter design itself seems actually quite good, as the pleated filter offers plenty of surface area to draw air in. I contemplated keeping the original air box and simply altering the intake snorkel to improve airflow. Thankfully the previous owner of this Alto was gracious enough to include an uninstalled HKS Super Power Flow as part of the package, so I neither needed to buy an aftermarket part, nor modify my existing intake.

2018-04-10 005.JPG

HKS filters have been criticized in some circles for being ineffectual or even poorly designed, as they say it can allow too much air particulates to enter the intake. Some famous Japanese tuners swear by them, though, and I’ve talked to a few owners who have put many miles (or should I say, kilometers) with the intakes and claim they work well.

Well, why not drop it in and see how it goes?

2018-04-15 007.JPG

The mounts it came with were OEM and did not appear to be the mounts HKS originally included, according to their manual, so I had to use some aluminum brackets for a proper fit to avoid hitting the hood or other components in the engine bay.

2018-04-15 006.JPG

While there is likely not a huge benefit for a stock-tuned engine, it might open up an ounce of HP if the engine can breathe more. The replacement HKS Super Power Flow intake sound is lovely, the sound of rushing air clearly audible in the cabin, even with windows up. These sounds, combined with the woosh of the recirculating valve, make the car sound lively around 3000 - 6000 RPM.

2018-04-15 009.JPG

Along with this installation, I used a super thin .3mm aluminum sheet bent and shaped to block off extra radiant heat from the engine, hopefully encouraging cooler air to be drawn in from around the right headlight. (Although it looks like cardboard from some angles, the brown is actually just an adhesive backing sheet I opted not to remove at this time.)

2018-04-15 010.JPG

This heat shield modification is only temporary until I redesign it with a thicker and larger aluminum sheet, which is already in progress. I would also like to use the dummy right inlet to the side of the headlight to potentially force more air directly into the air filter. Let’s see how that goes in the future...

June 05, 2018 /William Tjipto
Japan, JDM, Suzuki, Alto, Alto Works, HA11S, car, kei car, Car Life, F6A, RHD, HKS, スズキ, アルト, アルトワークス, 自動車, 軽自動車, 日本, 車, Mitsubishi, 4B11T, 三菱, Mazda, マツダ, M16A, AEM, Racing Beat
Cars, Japan, Ownership, Project Sachiel
Comment
IMG_1763.jpg

[ Alto Works ] Steering Wheel Modification

May 30, 2018 by William Tjipto in Cars, Japan, Ownership, Project Sachiel

Simple modifications that improve the Human-Machine Interface are critical for driving pleasure. Basically, anything that you touch, sit in, and control need to be comfortable. The steering wheel (or “handle” in Japan) is a major component of this, particularly since it connects you and the all-important direction of the vehicle.

2017-07-28 010.JPG

I have a particular affinity for Italian-made steering wheels, particularly Nardi over the arguably more common Momo, mostly because I like the feel of a slightly slimmer grip and the very classic look. I personally love the feel of slim-rimmed and small-diameter wheels, having fallen in love with them since I first put one on my Roadster. Nardi has made racing car parts since 1946 and with their heritage tied deeply with Ferrari, they certainly have the right prestige.

2018-01-04 019.JPG

Momo and many other companies make good products, undoubtedly, but there is something just right with a Nardi Torino. I will admit, though, I recently switched to a Momo wheel on my NA because I think the wood Momo Indy look complements my classic Roadster (plus) theme. I also got the Momo wheel at a steal, so I couldn’t pass it up. Now I need a wood knob to match. Which looks better to you guys, the Nardi or Momo?

IMG_4969.JPG

Not all is well with replacing a wheel, however. The main drawback is that, if the car was originally equipped with an airbag, you lose a very important safety aspect in a daily driver car. (Exploding Takata airbags notwithstanding.) If the steering wheel also has some utility buttons, such as those to operate the radio or cruise control, you will lose them, too. But perhaps most importantly, you also have the possibility of the passenger airbag not going off, too, putting a passenger at potential risk.

Of course, some of this can be mitigated. With proper safety gear like a harness, the risk of faceplanting in the steering wheel is lowered. (There are other associated risks with that, but let’s forego that extremely complicated discussion for now.) If you also install a proper airbag resistor, the airbag computer will believe the airbag is still installed, allowing the passenger and other airbags to continue to function properly and remove any airbag error lights in the gauge cluster. The airbag resistor, though, comes at a significant price cost or requires a bit of knowledge to make a DIY resistor. (You’ll need to know exactly the correct ohms resistance the airbag module uses.)

I’ve been using my classic 350mm Nardi wheel for awhile since my first Alto Works and it’s come full circle back on another Alto Works. It has definitely seen better days, but it’s still in good condition; no tears or rips in the high quality leather yet.

IMG_1760.jpg
IMG_1759.jpg

To install one, though, is simple, if not costly The steering hub needs to be adapted over to the 6-bolt pattern found on Momo and Nardi wheels, requiring a hub adapter. HKB Sports makes a wide range of inexpensive hub adapters, so finding one is easy. Luckily, this car was not originally equipped with an airbag, therefore it doesn’t necessitate a pricey airbag resistor. The HKB Sports hub was inexpensive at around 2000¥($18 USD) online, though the versions that are offered with airbag defeats are around 6000¥ ($55 USD) and up.

IMG_1761.jpg

Turn your steering wheel and wheels as 12 o’clock straight as possible and begin. On most cars, to remove the old steering wheel cover or airbag, you have to undo some bolts on the rear of the center / horn. There was none I could find here. It turns out the trick to remove the front panel is to push in and up. I put a bit too much force and ended up bending the metal brackets holding the horn cover. Oh well.

IMG_1762.jpg

Afterwards, it is a simple matter of undoing the tight nut attaching the wheel to the steering column, wiggling the wheel out, and putting in the new hub. Make sure the top arrow of the hub lines with the top dead center, otherwise, your turn signal cancellations may not work properly. This car had no airbag, so it’s a simple matter of connecting the horn and bolting it all in. For hub adapters with a airbag defeat resistor, you have to make sure they are carefully connected and taped or zip-tied snugly before the wheel is put in, offering enough slack and length for the wheel rotation.

Nice. Now I just need a 30mm hub adapter to get the steering wheel closer to me and I’ll be a happy driver. The feel of the right steering wheel makes the driving experience so much better. Now that the car is feeling better, we can make the car perform better...

May 30, 2018 /William Tjipto
Japan, JDM, Suzuki, Alto, Alto Works, HA11S, car, kei car, Car Life, F6A, RHD, スズキ, アルト, アルトワークス, 自動車, 軽自動車, 日本, 車
Cars, Japan, Ownership, Project Sachiel
6 Comments
2017-05-28 011.JPG

Karuizawa Meeting 2017

May 23, 2018 by William Tjipto in Cars, Japan
DSC_5677.JPG

I had a chance to attend the largest annual Mazda MX-5 Roadster meet in Japan on May 28. (Miatas to us Americans.) Nestled in the mountains of central Japan, Karuizawa is a small, fashionable, and beautiful city in Nagano Prefecture. Though centrally located, the small, local roads make it a slow drive to reach from Tokyo, Osaka, or Fukui, where I am from. Luckily, the weather was absolutely gorgeous that day and I had a wonderful time chasing down local Roadsters on a curvy mountain pass from my hotel.

DSC_5967.JPG
DSC_5895.JPG
DSC_6018.JPG

Coming across the first lot, little convertible cars stretched as far as I could see. Briefly walking the first of the two visible lots, I was mesmerized by the sheer amount of varying combinations of colors, wheels, and kits. Most were tastefully adorned with a few select parts, like a beefy set of wheels, a roll bar, an aftermarket front bumper, and/or lowered to just the right usable height.

DSC_6727.JPG
DSC_6088.JPG

To an MX-5 fanatic, this was absolutely heaven. Nearly every car present was meticulously maintained,  despite the early NA6 Roadsters ticking at 27 years old. Here, one could find all generations with crazy conversion kits, rare parts, NB coupes, lovely stock examples, and everything in between.

DSC_6374.JPG
DSC_5991.JPG

For you Stance or Slammed fans, sadly, very few would have made you tingle. The blue one looks like it is rocking a Project-G bikini top.

DSC_6260.JPG

Stopping halfway through the second lot, I was puzzled. How could this possibly be the largest MX-5 meet? While it was impressive, where were the booths of manufacturers, the demo cars, the free lunch I was promised? My stomach gurgled, sustained only on rice balls, water, and Monster.

DSC_6180.JPG

Maybe it was the tiredness of driving so much the past day, but I was certainly not aware of the procession of people passing beyond the trees. And there it was. The main lot.

DSC_6452.JPG

I had been wasting entirely way too much time on each individual car. It was already noon and I rushed straight to the dealer tents drawing the crowds.

DSC_6340.JPG
DSC_6344.JPG
DSC_6360.JPG

ZOOM Engineering, Barchetta, and Jetstream had so much to offer. My heart raced as I wiped a bit of sweat from my brow. How much could my wallet handle? The cash and carry society made it impossible to overspend.

DSC_6406.JPG
DSC_6327.JPG
DSC_6368.JPG

Here were some of the demo cars that certainly were excellent displays of the company offerings. Garage Vary's ND looks ready to attack the track or local mountain roads alike.

DSC_6337.JPG

Also in attendance was the 1,000,000th Roadster made, an ND Roadster in Soul Red, adorned with signatures from its travels abroad.

DSC_6976.JPG
DSC_6601.JPG

One thing I noted, after walking the lots, was the distinct lack of engine swaps. (Of course, definitely not the V8 LS engines Americans often swap in.) Most of the open hoods had element filters and tower braces and were meticulously clean. Few others had ITBs or forced induction. Closed hoods had no hints of intercooling, so I could only assume the rest were similarly stock. Nonetheless, you could tell these owners appreciated taking care of their car and leaving it as the Mazda engineers had intended.

DSC_5826.JPG
DSC_5849.JPG

Some car clubs were out in full force. The two more notable groups were the Nara Gundan Roadsters were adorned with huge stickers and usually some strange theme.

DSC_6915.JPG

Shin-kai went with full kits, gorgeously blended into the fenders. Absolutely stunning examples.

DSC_6638.JPG
DSC_7046.JPG
DSC_6670.JPG

The love was evident all around. Plenty of homemade DIY modifications and customized parts if you look carefully enough.

DSC_6430.JPG
DSC_6983.JPG

See you guys this year. I’ll be there.

DSC_5879.JPG

www.karuizawa-meeting.com

May 28, 2017

May 23, 2018 /William Tjipto
Japan, JDM, Miata, Mazda, Roadster, Karuizawa, Nagano, 日本, マツダ, ロードスター, 軽井沢, 軽井沢ミーティング, 長野, na, na6, na8, nb, nb1, nb2, nc, nd, Karuizawa Meeting
Cars, Japan
Comment
2018-04-15 002.JPG

[ Alto Works ] First “Modification” and Wheel Spacers

May 14, 2018 by William Tjipto in Cars, Japan, Ownership, Project Sachiel
2018-04-14 013.JPG
2018-04-14 076.JPG

The car is all well and good so far. Not one day into the ownership of the car, I started making a laundry list of the variety of things must be changed. First was the removal of the extremely heavy and unnecessary audio system. There was an embarrassing tangle of wires and it turns out the rears were not even connected at all, as the positive lead was disconnected. The subwoofer box, as you might surmise, was pretty heavy. I am glad to be rid of it and the rear speakers. The front speakers and head unit will stay, as it has USB / iPhone connectivity so I can listen to my awesome audiobooks. (I’m so exciting that way.)

2018-04-14 034.JPG

Here’s one modification that may draw some scorn from car purists: wheel spacers. Cheap, flimsy, aluminum “universal” 5mm spacers not center-bored to the hub, at that. I am well-aware of the potential issues of spacers, of which there are many. Adding width adds additional wear to the bearings and suspension components, changes the handling (for better or worse), and non-hubcentric spacers can potentially upset the car at high speed if they are off-center, creating potential vibrations. Moreover, simple sandwich spacers such as these reduce the amount of thread the lug nuts can tighten over, further reducing safety.

2018-05-11 004.JPG

These are more appropriate wheel spacers, as they are specifically drilled for sets of specific patterns and are hubcentric to the diameter of the car. In this case, these are the perfect set for my Swift Sport, at 5x114.3 with a 60.1 center bore. For the Alto, I would need 4x100 with a 54.1 center bore.

2018-04-14 075.JPG

At least, I did ensure that it was as centered as possible. What these spacers do is change the look of the wheels. They are now spaced out 5mm toward the outer edges, effectively changing the wheel offset from +45 to +40. I think they look a bit better, since they aren’t as far sunk into the fenders. In the end, knowing the drawbacks, I will leave them on. Keeping the nuts checked and tightened periodically will be a necessity. Further, as I don’t plan on tracking this car, nor drive it particularly long distances, the wear and the potential issue will be minimal, at best (or is it worst?).

2018-04-15 003.JPG

I do have the option of going with larger 15mm or 20mm sandwich spacers with studs attached to stance out the car a lot more, which looks like it may also require a fairly aggressive fender roll. But for now, this spacing is adequate. I’d like to go with much wider wheels in the future, like a 13 x 5.5 inch wheel. I suppose 14 inch wheels would be fine too, but I think 55 series tires and 14 inch wheels don’t have enough rubber sidewall for my taste. The look of fat tires is definitely more appropriate to the style, in my opinion. This is an adequate temporary modification to keep my car looking fresh(er).

May 14, 2018 /William Tjipto
Japan, JDM, Suzuki, Alto Works, Alto, スズキ, アルト, アルトワークス, 自動車, 軽自動車, HA11S, 日本, 車, car, kei car, Car Life, F6A, RHD
Cars, Japan, Ownership, Project Sachiel
Comment
  • Newer
  • Older

Powered by Squarespace