Ready Seat Belt

レディー・シート・ベルト

A look into the cool and bizarre, focusing on the Japanese import car culture and delicious ramen. Updated weekly.

  • Home
  • Blog
  • Food
  • Archive
    • Complete Archive
    • Ramen Archive & Map
    • Suzuki Alto Works HA11S
    • Suzuki Alto Works HA12S (Scrapped)
    • Suzuki Swift Sport ZC31S (Sold)
    • Suzuki Wagon R MC22 (Scrapped)
    • Newbie Guide
    • Photography
  • About
  • Facebook
  • Instagram
  • Twitter
DSC00111.JPG

[ Photography ] Peak Design Capture Clip V3 Review

March 15, 2019 by William Tjipto in Photography, Reviews

Today I’m taking a look at an alternative (or addition) to camera straps and slings. For nearly a decade, I used an ECHO NiNER camera strap with my Nikon and it worked out pretty well. While it wasn’t the most adjustable or smooth strap, it was certainly well made, with thick nylon webbing, solid quick-release buckles, and silicone non-slip coating. I worried that maybe somehow the buckles would accidently undo themselves, but I never had an actual issue.

I generally became tired with traditional straps because I wasn’t fully satisfied with the feel of a camera on my neck and the thick bulk of the E9 really could be improved. (Do I really need mil-spec webbing on a camera?) The idea of using a “holster” sounded pretty good. The most popular type at that time was the Spider Holster which necessitated a ball mount be affixed at the bipod mount. The biggest issues with that are it is no longer quickly mountable to any tripod and the camera no longer sits flat on any table. And the holster itself is pretty bulky. Not worth the hassle, frankly.

Peak Design introduced their Capture Clip several years ago as an alternative and it was pretty revolutionary, in my opinion. It was much smaller, flat, and compatible with Arca-Swiss tripod mounts. The “holster” clip itself was small, slick, and could be mounted on a variety of places, including backpack shoulder straps, making it extremely convenient and the camera still within easy access. Moreover, a friend of mine recommended me the PD clip since he used it with his own DSLR while hiking, keeping the camera hands-free when doing the Pacific Crest Trail through-hike. (Speaking of which, if youre into hiking, please head over to his site Halfway Anywhere to check it out. He’s crazy avid and runs a great site.)

Having picked up two camera bodies recently, I knew being able to switch between them halfway easily would be great, not to mention I wanted to try a different way to hold my camera while exploring. The typical over-the-neck carry wouldn’t work with two bodies and no way was I going to use those dual camera vests. So the idea of the capture clip really fit that need.

I’ll admit, I picked up a cheap, fake PD clip copy several years ago. First of all, at around $10 USD, the price was right. I needed to know how well it works and even if I would find use for it before investing in a real PD clip. And honestly, with one camera body and the camera strap. I had little use for a capture clip. So it basically sat in my closet for 2 years or so. For good reason, it turns out. But I’m getting ahead of myself, let’s start with a look at the real deal.

DSC00090.JPG

Peak Design Capture Clip V3 Review
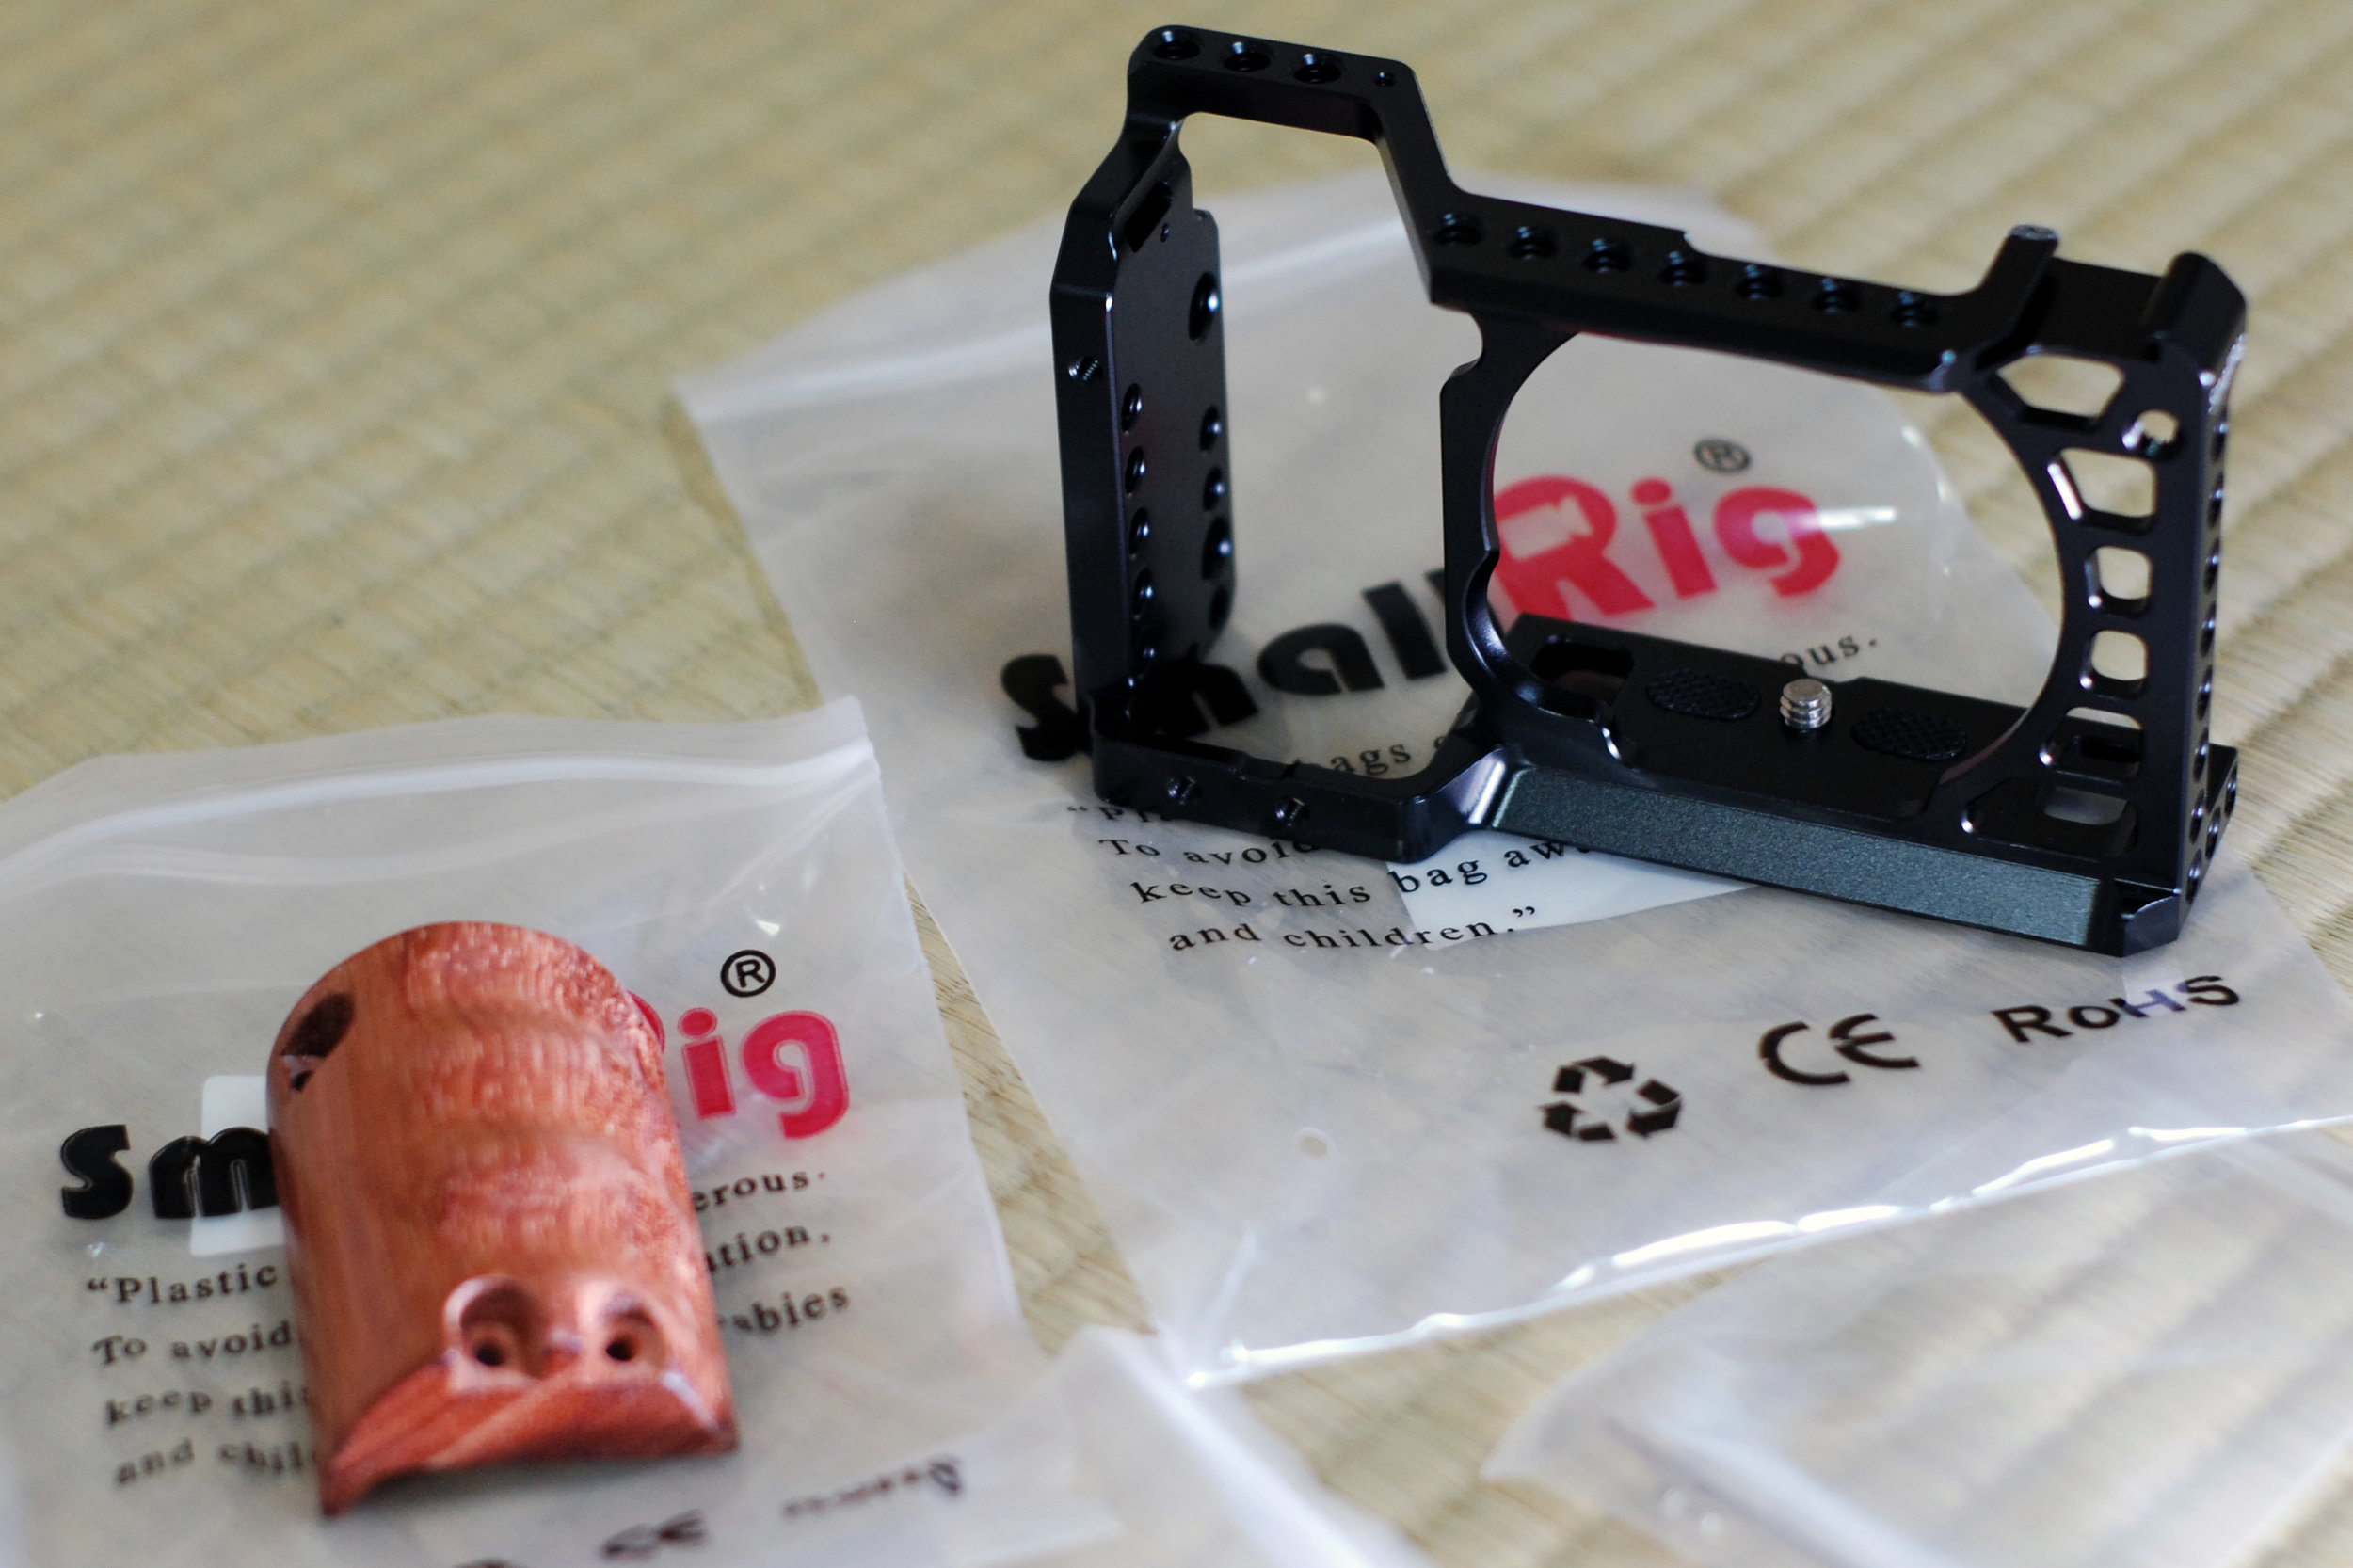
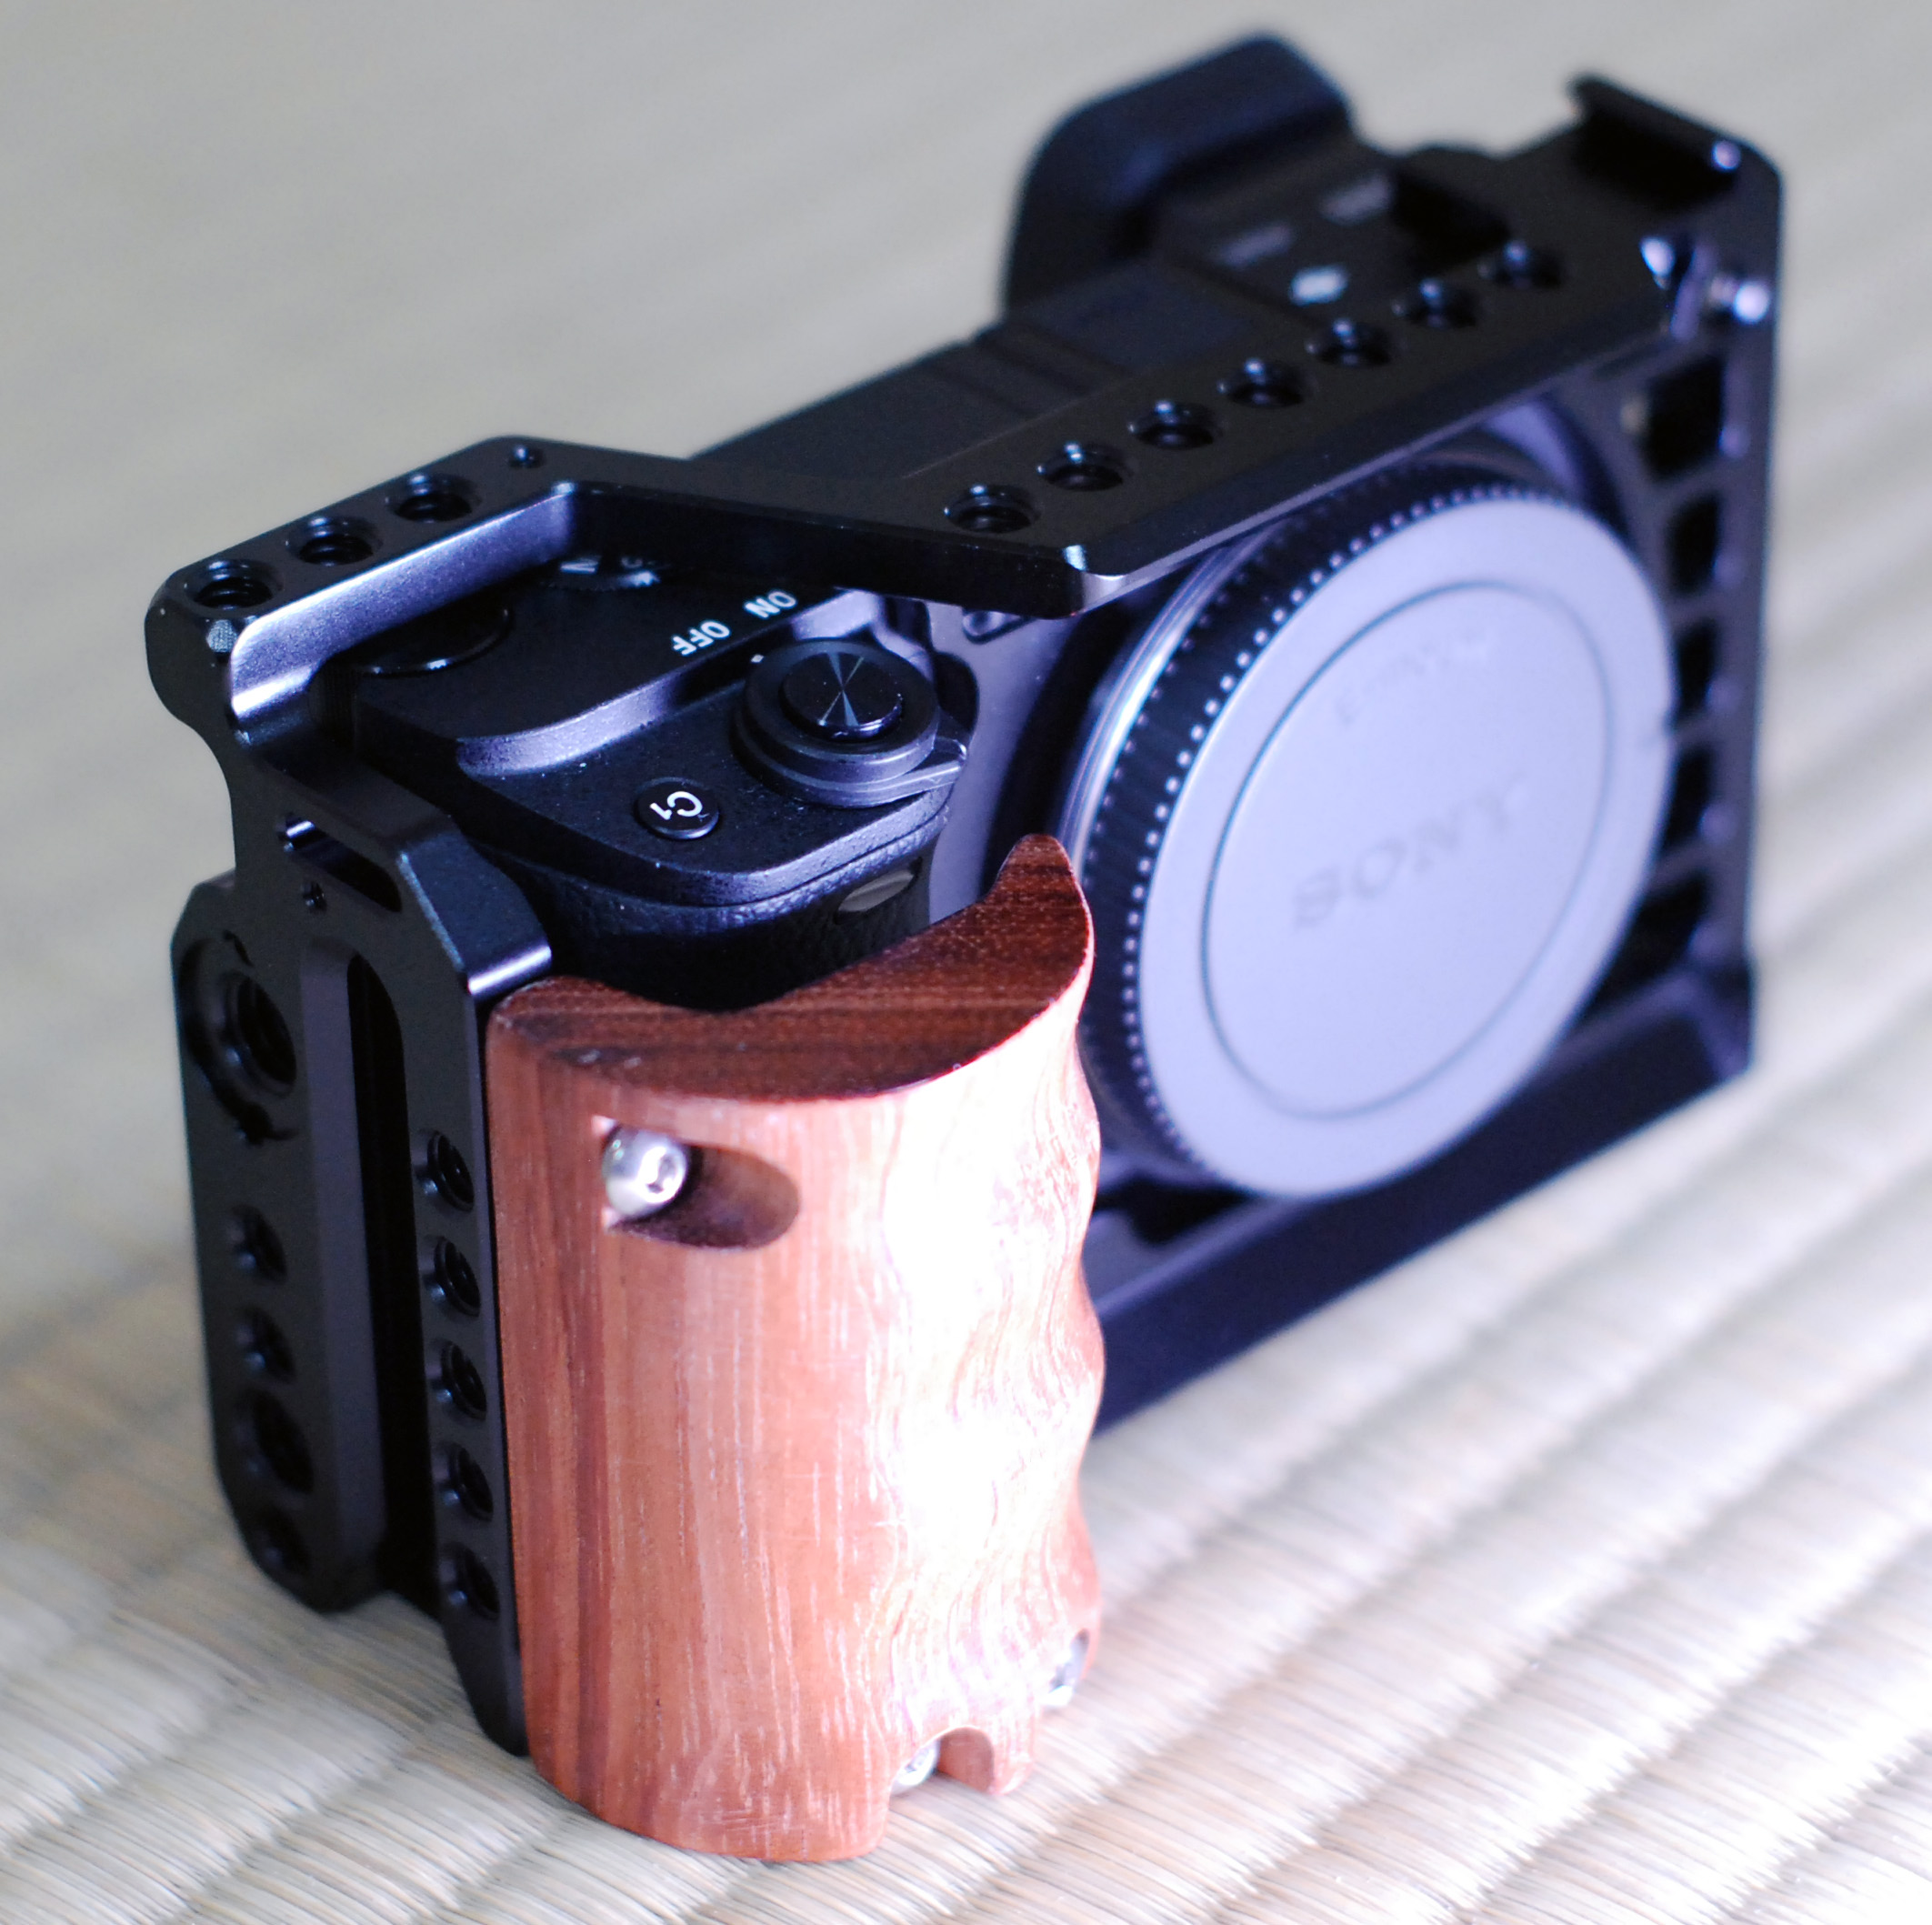
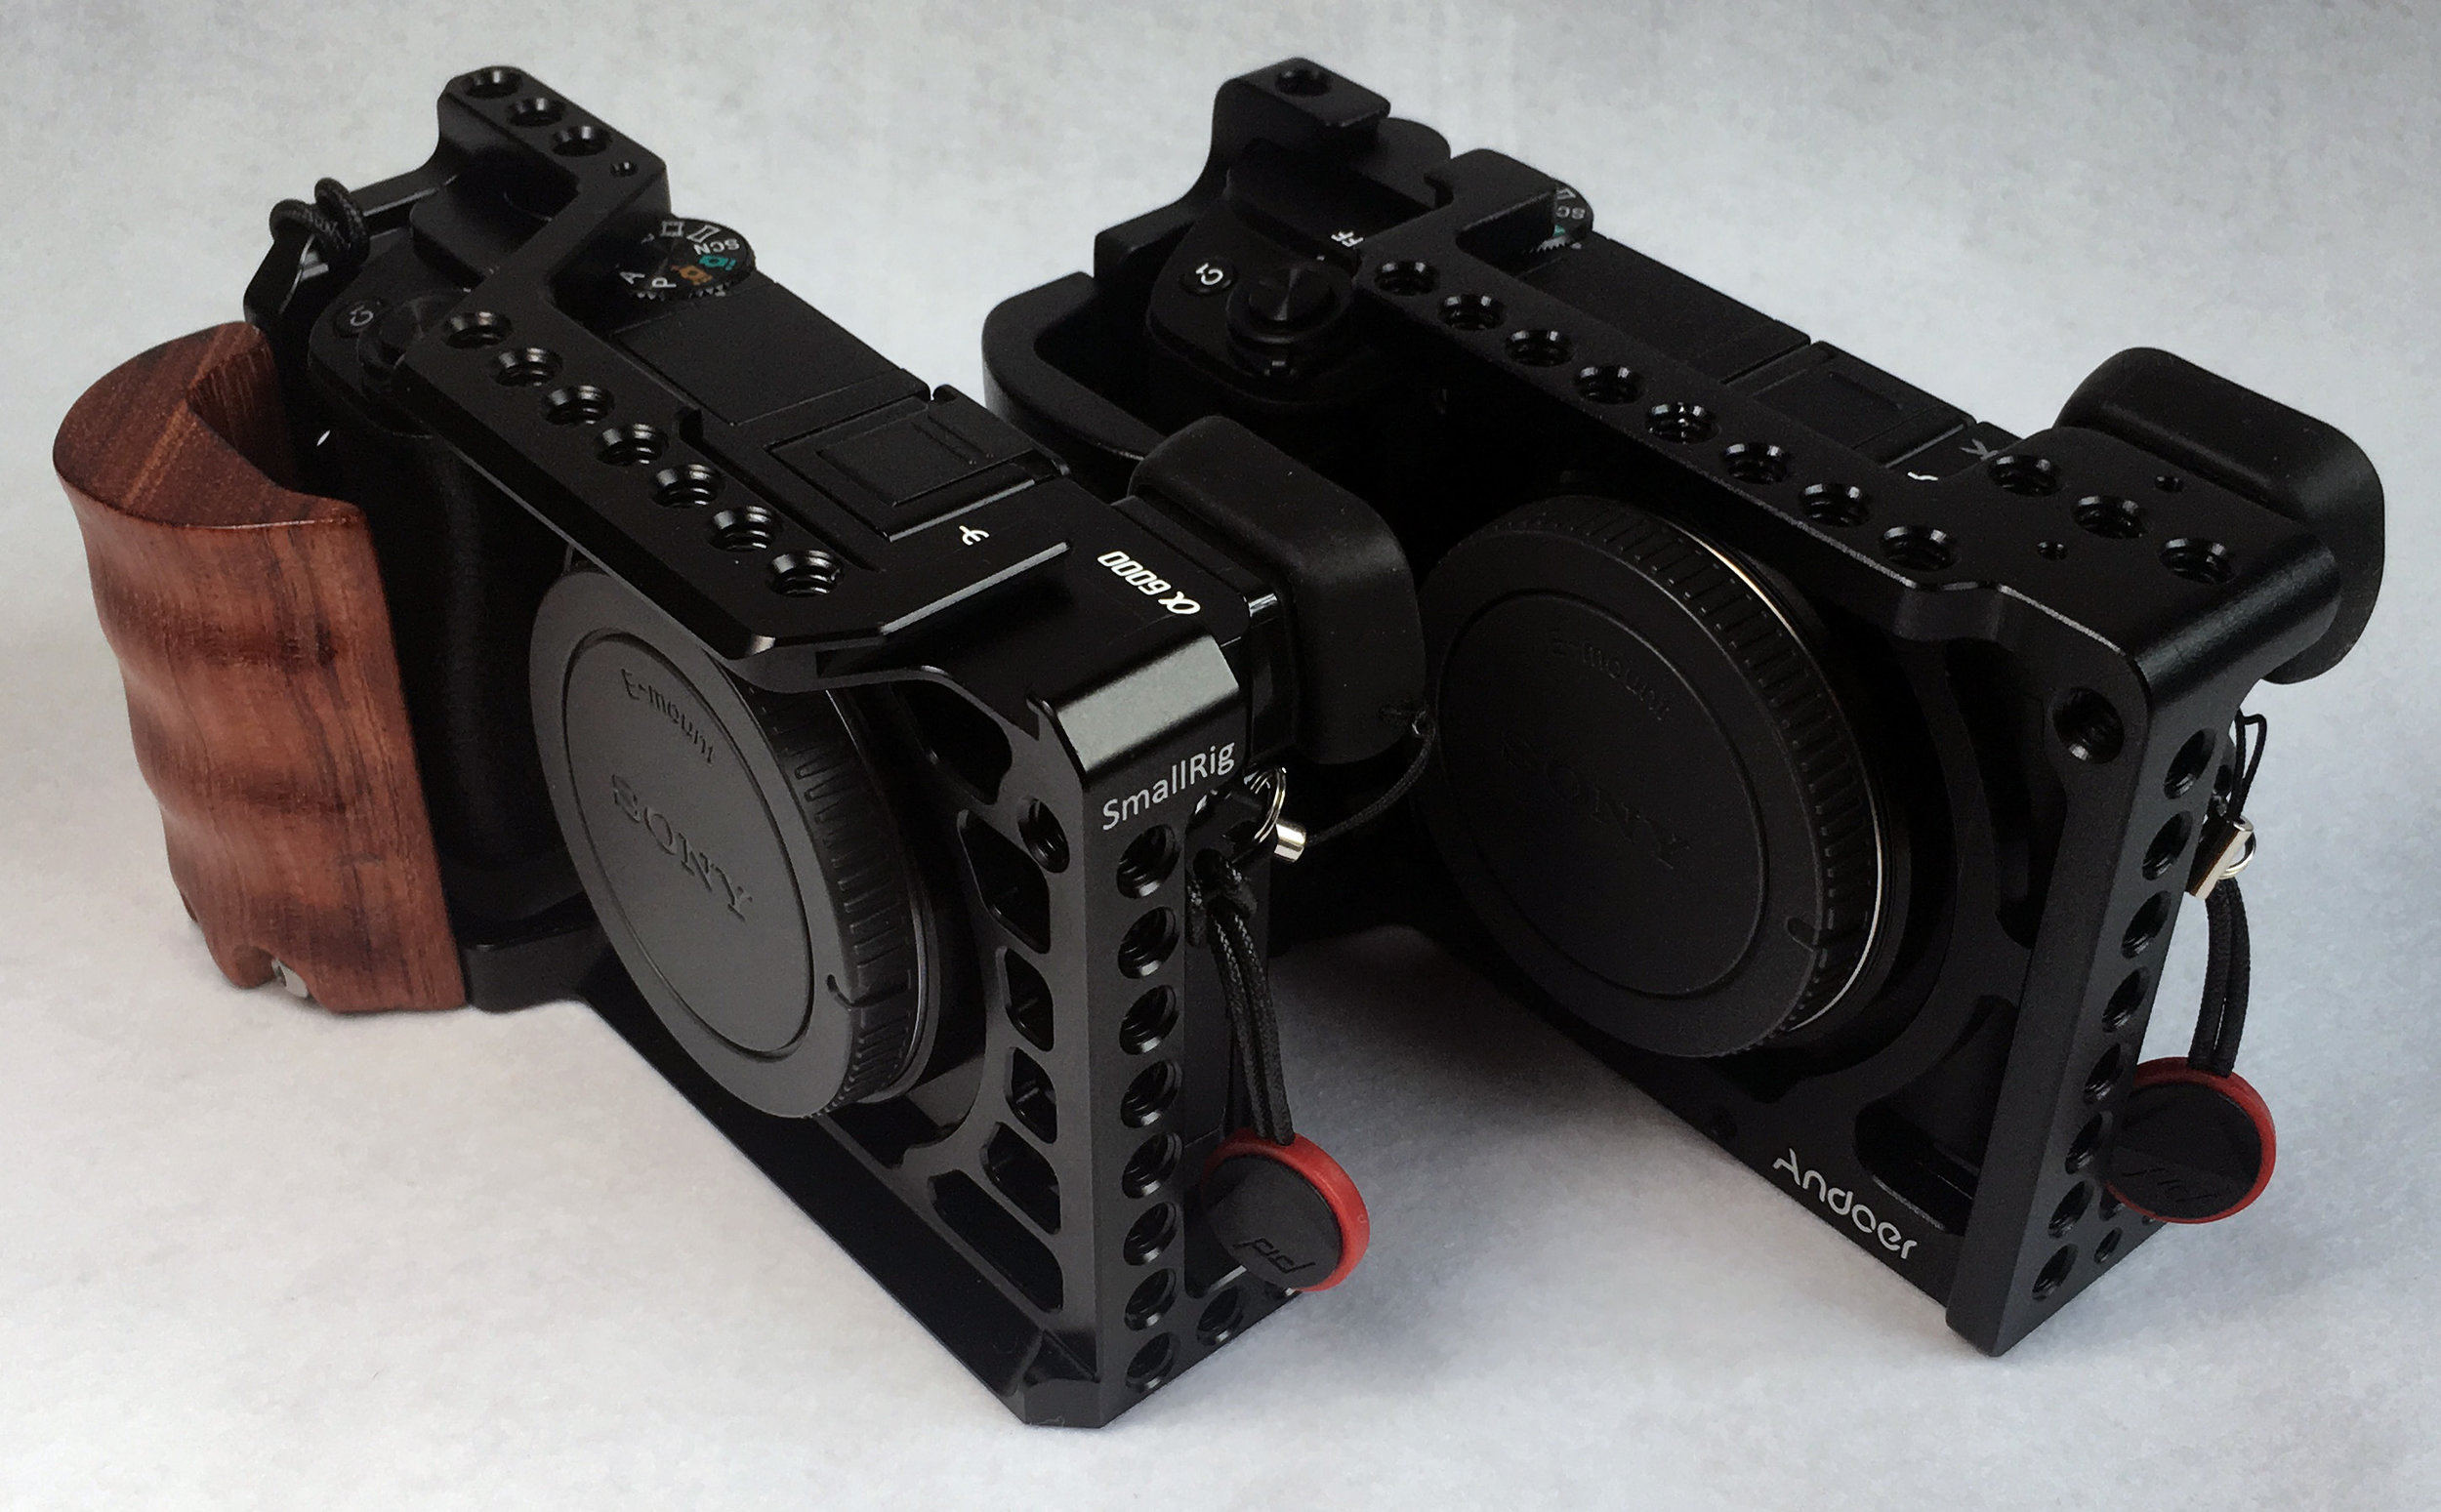
This PD Capture Clip is the third iteration and has been fairly significantly redesigned to be smaller and sleeker than the two previous versions and it also comes in black and this shiny satin silver. The mounting plate is also thinner than before, but is still fully Arca-Swiss compatible. The clip can be mounted on a wide variety of straps and belts, as long as they are under 2.5” wide and .88” thick. In my case, I mounted it mid-way on the left shoulder strap of my Adidas backpack.

DSC00106.JPG

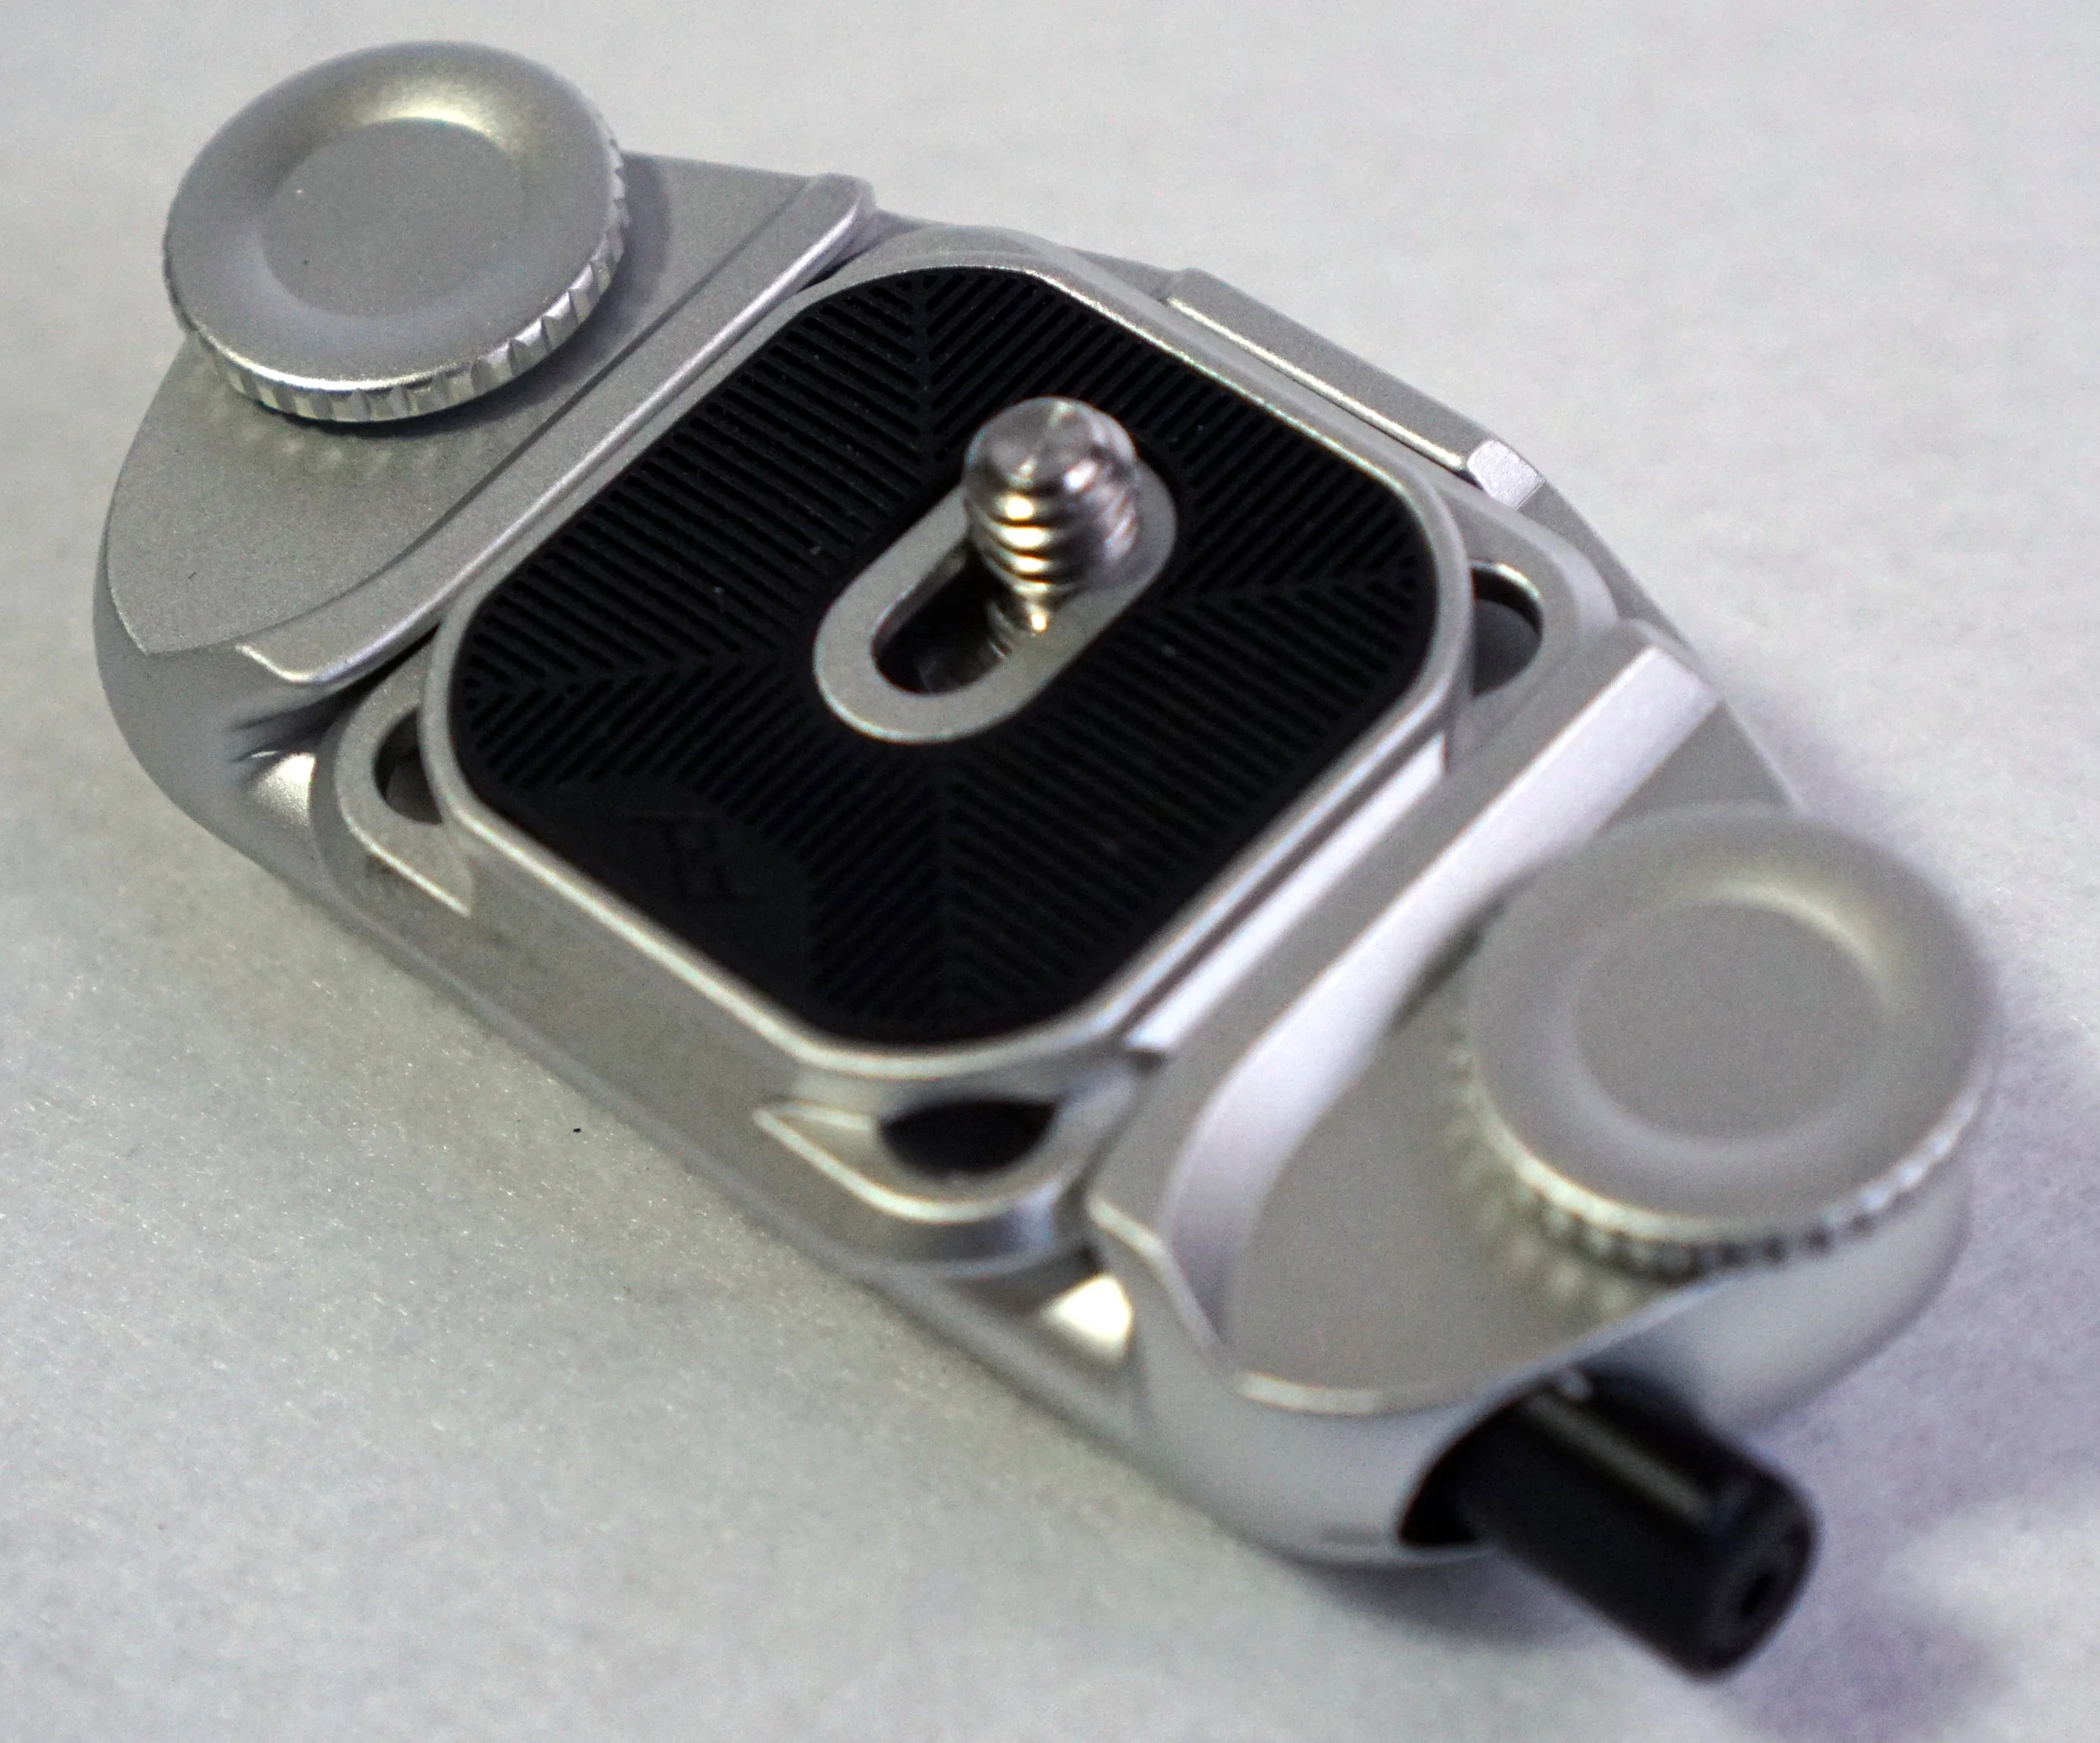
The mounting plate is screwed to the ⅜” tripod mounting thread on the bottom of a camera or in my case, to one of the threads on the cage. Sliding the plate into the clip will automatically result in an audible “click” and the plate is locked into the clip. (The plate can only be slid into the clip one-way and removed as such.) This results in a very secure holstering solution for your camera and PD claims that it has a 200-lb holding force, far more than virtually any camera setup and is probably much stronger than the fabric you’re mounting it to.

DSC00093.JPG

To remove the plate from the clip, simply push in the button on the side and simultaneously slide the plate (and attached camera, of course) out.  With a bit of use, I was able to easily push the release button and pull the camera off the clip with one hand. Of course, I would advise this only with at least a hand strap or shoulder strap attached… you know, just in case you’re not as dexterous as you think you are. For extra security, the redesigned plate also resulted in the one toggle switch on the side of the clip serving as a safety lock function. Rotating the toggle switch 90° results in a safety lock that prevents the button from being depressed and therefore keeps the plate locked in place. It needs to be rotated back before the button can be pushed in.

The size and convenience of a smaller “holster” other than the Spider holster is obvious, but why does the clip work better than any traditional carry strap or sling? It allows for hands-free carrying of the camera when not in use for longer periods of time, especially when more strenuously walking / hiking about. With a traditional over-the-neck strap, the camera bounces around against the body without a hand to stabilize it. When carried over-the-shoulder, the strap can slide off the shoulder, again, without a hand to hold it. Carrying the camera crossbody works well, but it doesn’t work comfortably with a backpack or shoulder bag, resulting in straps crossing other straps; a messy ordeal if you ever need to take one and not the other off. In addition, being mounted on a backpack (or other shoulder strap) results in better weight distribution since such straps often are thicker and offer more padding than most camera straps.

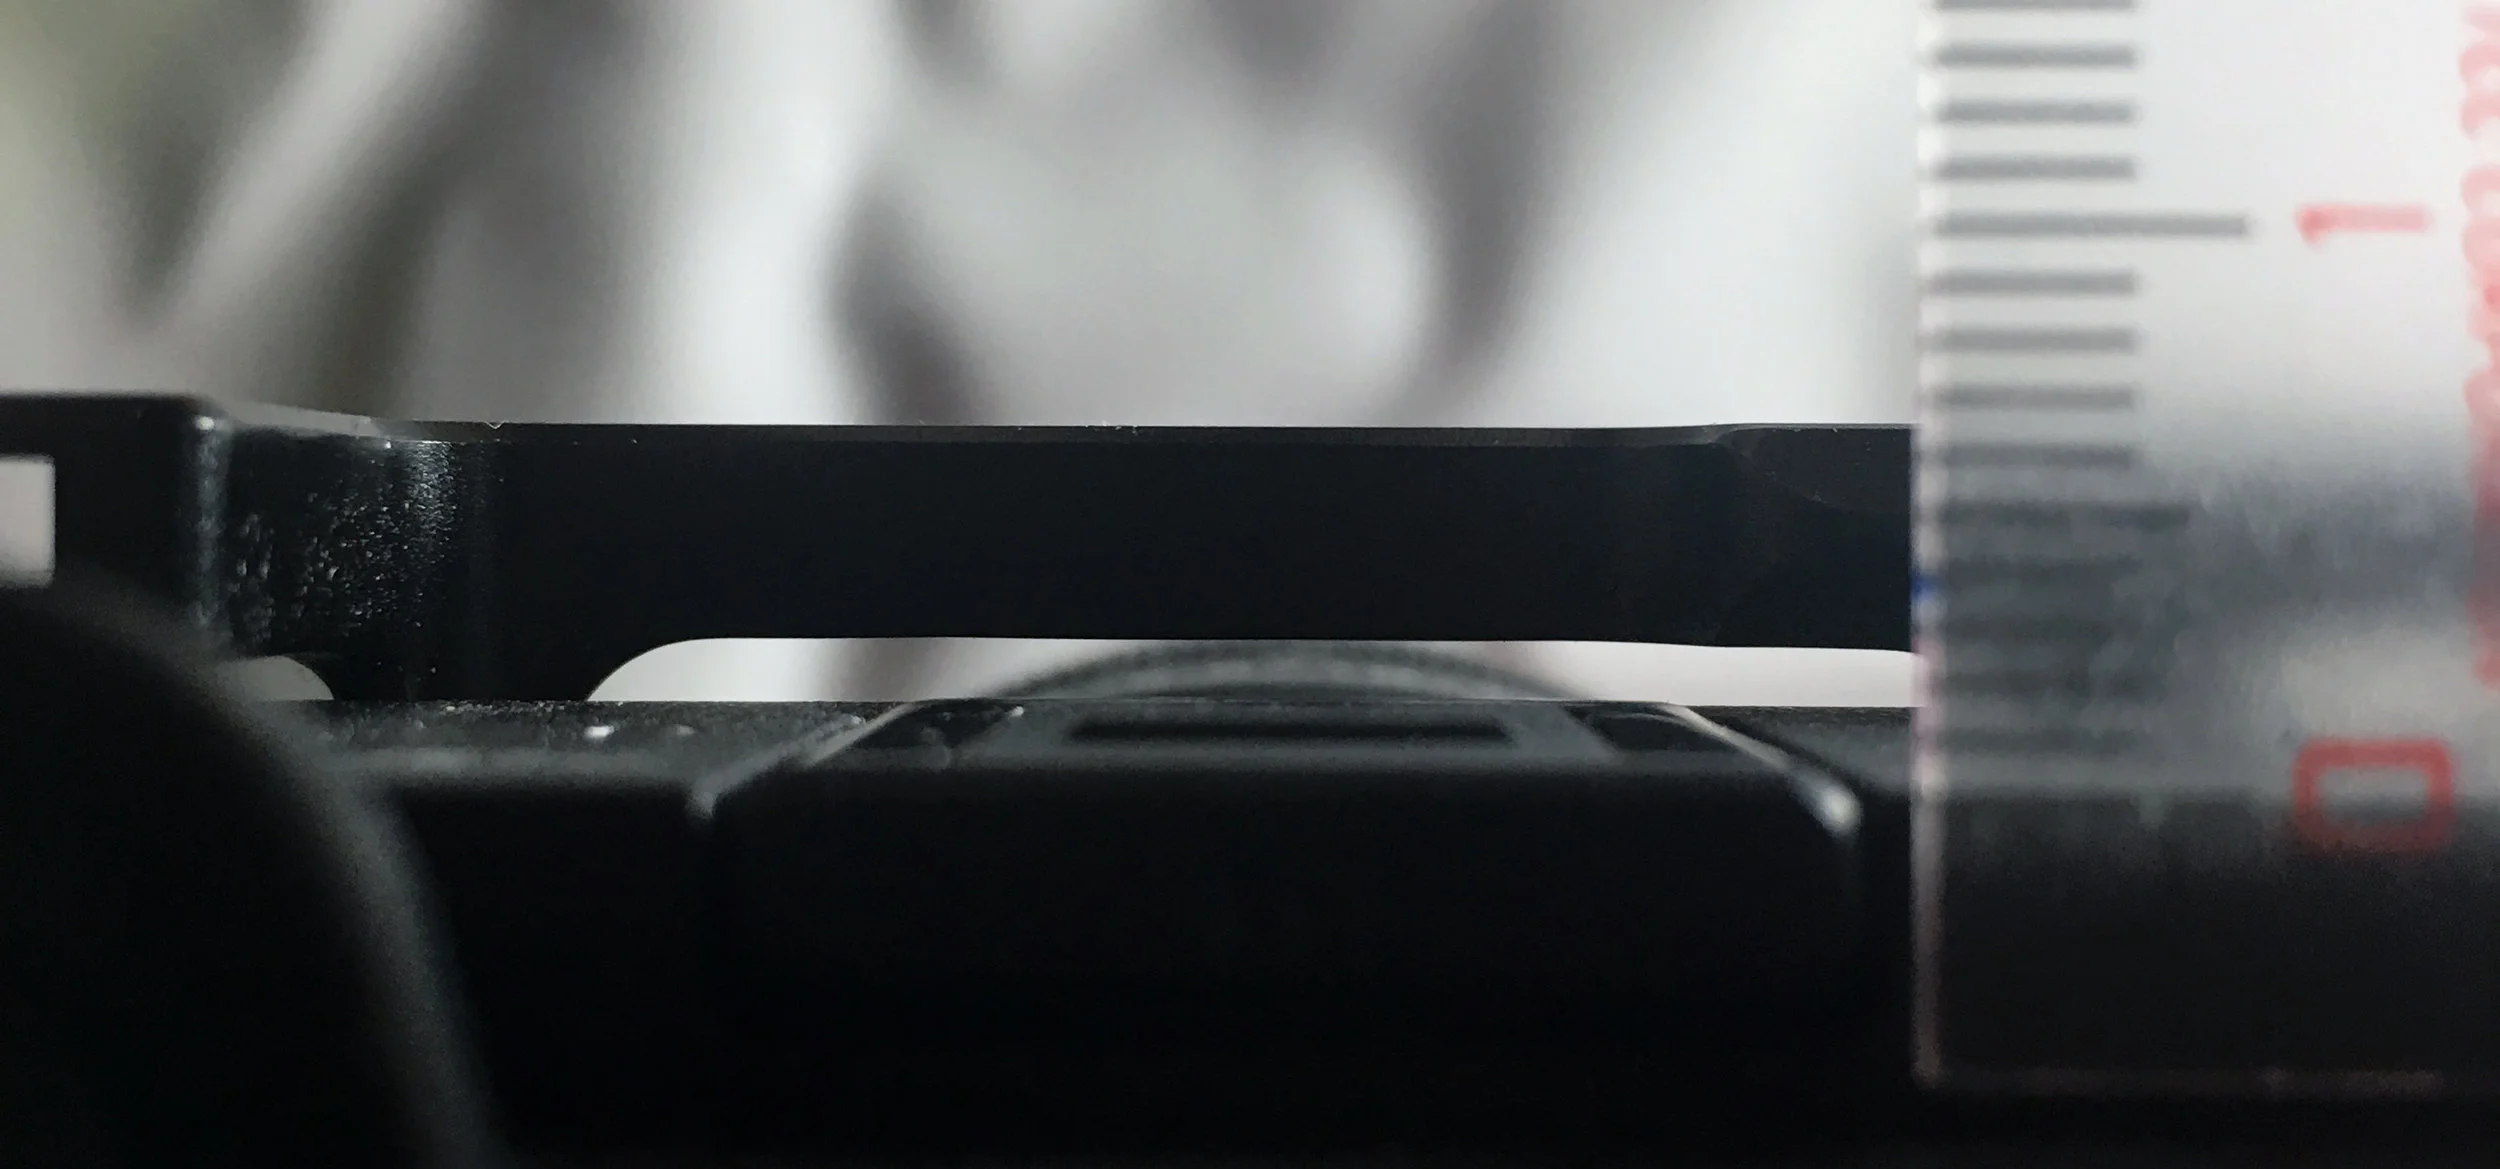
While the PD clip certainly sounds absolutely awesome, I do have a complaint, but it could be easily remedied by PD. It relates to the two mounting thumb / sunken head screws. First off, why do the thumb screws lack a coin/flathead slot to help tighten it down? It seems like an oversight considering those two screws hold potentially thousands of dollars of equipment and that some people may lack the necessary strength to really get it tight, even if they have to make the head just a few millimeters thicker for more material. Secondly, why are only two sets of same-length screws included? Does it really cost that much more to include a second, slightly shorter set? My backpack’s shoulder strap is actually fairly thin, so when the thumb screw is fully tightened, there is about 3mm of threading poking out the back of the clip, potentially cutting into my clothing.

Yes, I could take a dremel to it or buy a second set of screws (which I will), but this seems like a huge oversight and I’ve sent an e-mail over to PD. I’ll update if I hear any feedback from them regarding this. (Update 3/19: they “are considering” the coin-slotted screws and they do not offer any shorter-threaded screws. Too bad, but not a break-it for this product.)

DSC00094.JPG

Viltrox (Copy) Review and Comparison
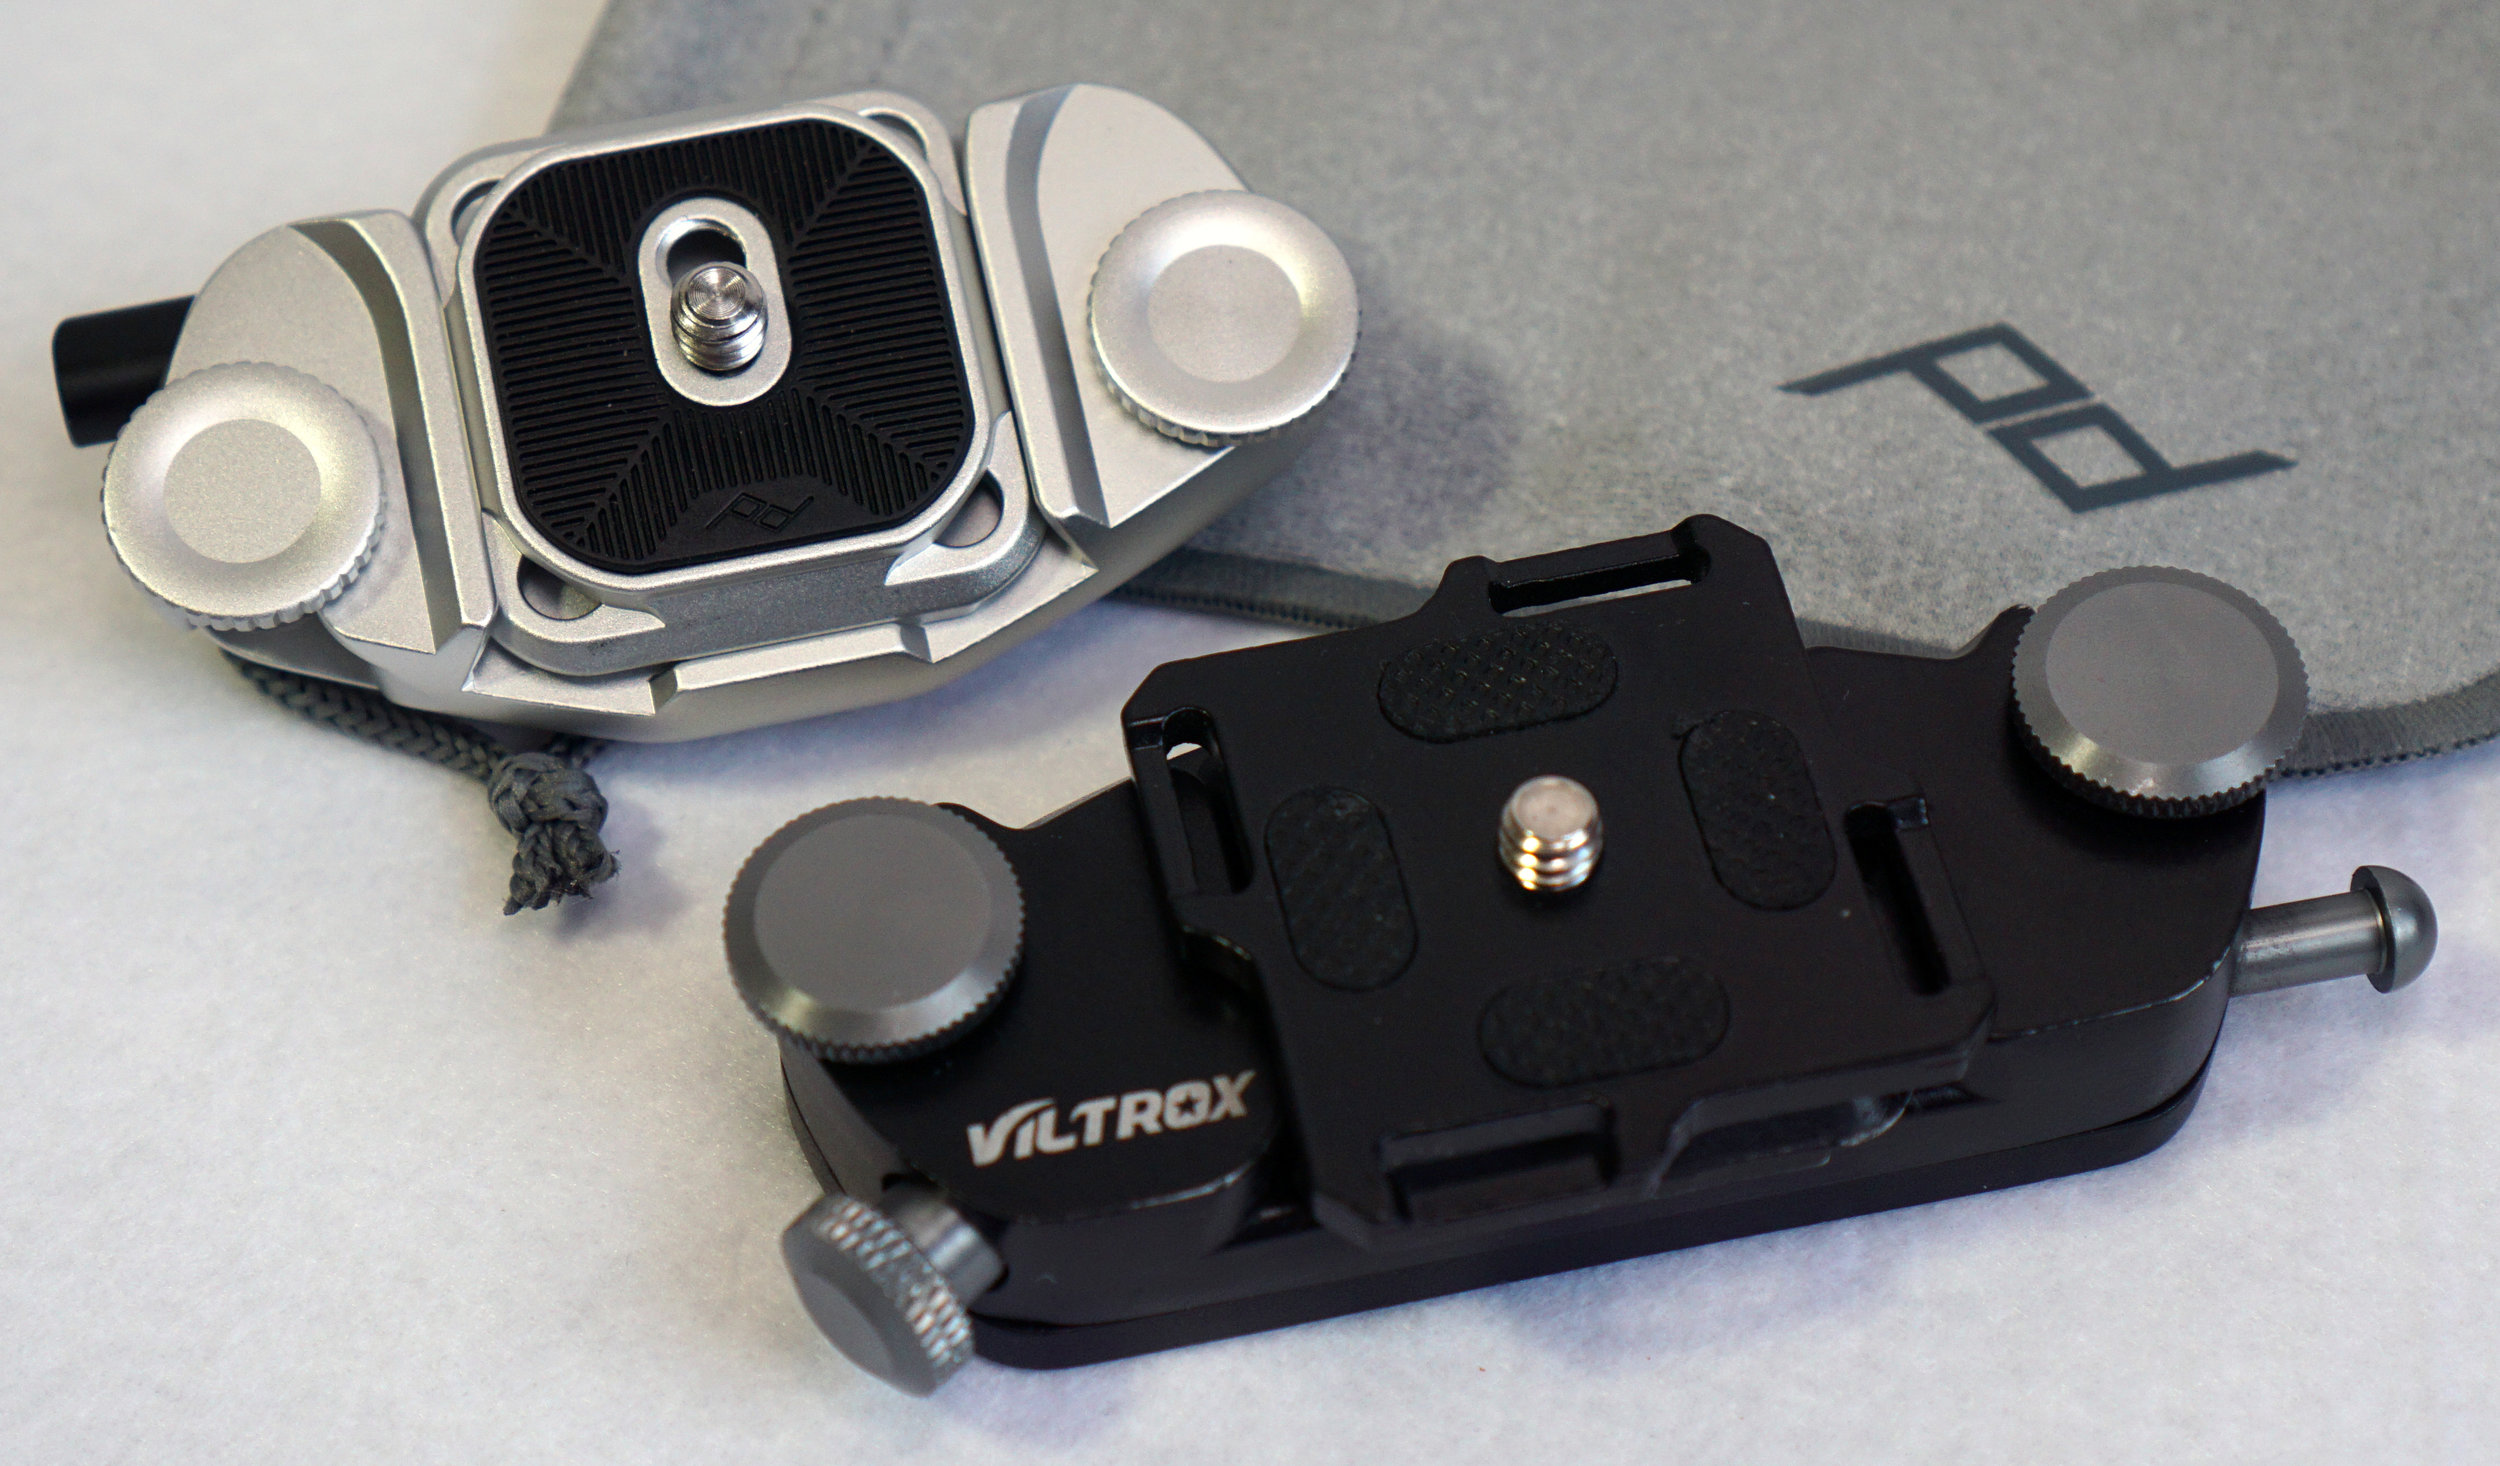
This Viltrox-branded Capture Clip is a clone of the original PD V1 design, so there are a few differences when we compare the V1 to the current V3. The most apparent is the footprint size. The V1 is much larger and wider. The larger size is nowhere more noticeable than when mounted to a backpack shoulder strap, as the width is definitely felt. My arms definitely hit the side of the clip quite frequently and that might be the main reason I never decided to use this clip in that intended position.

DSC00096.JPG

There is also a side tension screw which tightens the slack between the clip and the camera mounting plate. Tightened all the way, the screw acts as a lock, preventing the removal of the camera.

The button to remove the camera plate is also quite long, which I suppose is good for larger DSLR cameras. The metal button definitely has a more positive feel compared to the smaller V3 button, so in some instances, I like this better.

DSC00103.JPG

The V3 and V1 plates are both fully compatible for the V3 Capture Clip, but unfortunately, the V3 plate does not work with the V1 knock off clip, due to the shallower mounting plate, resulting in the camera body contacting the thumb screws. This is a small price to pay considering the smaller footprint.

DSC00097.JPG

The finish on both clips really can’t be compared. The PD clip has a wonderful anodized aluminum finish whereas the V1 clip has a somewhat uneven coating and the metals are quite heavy, porous, and somewhat poorly casted. To be fair, this piece of copied chunk of pot-metal is only about $10 USD, shipped. I’m not sure I can really complain a whole lot besides the fact it’s a copy. Luckily, to my knowledge, there are no knock off V3s of the capture clip yet. Maybe those Chinese companies aren’t willing to retool for the newer version.

DSC00113.JPG

Testing
Of course, testing something like this is purely subjective, as it highly depends on your needs and gear setup, but I’ll tell you what I thought after about a solid week’s worth of use walking and hiking around for the whole day in winter weather.

I currently have the V3 Capture Clip mounted on an Adidas 26L OPS backpack, a decent “box” type backpack so trendy now in Japan. While the padding on the shoulder straps are not particularly thick or heavily padded, they are adequate even when the backpack is fully loaded with two cameras, a sweater, a 14” laptop, and associated peripherals. This made it a perfect specimen to mount the clip, as I could see how comfortable it would be with weight directly on my left shoulder strap.

I found that while I could theoretically have two camera bodies walking around, it still was a bit of a hassle having to switch off between them, as I needed to make sure I wouldn’t drop one while drawing or holstering the other. Since I didn’t change bodies often, I more often than not just ended up leaving one camera in my backpack.

DSC00422.jpg

Did that make the Capture Clip a moot purchase? Nope! I still found plenty of use for it for the hands-free purpose, locking the camera into the clip when I didn’t need it when strolling around. It proved especially useful hiking up a somewhat icy treacherous mountainside path to take some of these gorgeous views.

March 15, 2019 /William Tjipto
SONY, ソニー, 6300, A6300, ALPHA, アルファ, MIRRORLESS, DSLR, DIGITAL, デジタル, CAMERA, カメラ, DIGITALCAMERA, デジタルカメラ, OSS, PHOTOGRAPHY, フォトグラフィー, PHOTO, フォト, PICTURE, 写真, 撮影, SMALLRIG, カメラケージ, CAGE, CAMERACAGE, PEAKDESIGN, PD
Photography, Reviews
Comment
2019-01-05 088.JPG

[ Sony Alpha ] SmallRig 1889 Cage & Andoer Cage Comparison & Review

February 18, 2019 by William Tjipto in Photography, Reviews

One of my minor complaints thus far with my Sony A6300 is the tiny grip, as I mentioned in my initial review. As I have rather comparatively large hands and having used a DSLR for many years, I wanted to make the Sony much more comfortable on long shoots. I considered a Meike battery grip extension for around $60 or various leather grips for a bit more. The leather grips are rather ugly and bulky, giving the camera an old feel which isn’t necessarily appropriate for the modern look of the camera. (If I had a Fujifilm or Leica, it would look pretty great.)

The Meike battery grip extension offers a few benefits, namely that it increases the grip length for my loose pinky and holds two batteries for extended shooting time, potentially also keeping the camera cooler during long video sessions. There is also a “portrait mode,” which uses the shutter trigger button on the side of the grip for using the camera vertically. Personally, that is a bit dubious of a function for me, as I doubt I would ever need that. One issue with increasing the height of the camera is that it will be more difficult for it to be stored, drawn from a backpack, and generally carried on a strap. As much as I would like having longer battery life, I can’t think of many situations where it would be preferable to have longer run time than ease of changing memory cards, since this battery grip blocks the memory card access.

In the end, I decided on something that could not only offer a potentially better grip, but adds protection for the camera body itself. Seeing plenty of reviews scattered all over the internet, I looked into camera cages.

DSC_3034.JPG

Camera Cages
At first, I thought it would be silly to add a fairly weighty chunk of aluminum around the camera. Why would anyone want to do that? With a bit of research, I realized they are practical and add some extra functionality at the cost of additional weight and bulk.

The primary use for a camera cage is to expand mounting options on a camera. Most cameras only offer two mounting solutions, a hot shoe on top for flashes, microphones, etc. and a bottom tripod mount. To expand these options, some have used a cold shoe mount splitter, which expands the top to offer two or more mounting points. Some attachments at the bottom expand other mounting solutions. However, if you want a solution that can do it all (and then some), cages are the way to go, as they have multiple ¼” and ⅜” mounting threads and some offer extra cold shoe mounts, NATO-spec rails, rod mounts, or ARRI mounts. This exponentially increases the options you can add.

Why is all this expandability so important? For most photographers, these features are rather moot, since usually only a handful of accessories are needed. For videographers / vloggers, those two items are not enough. Some need to add a plethora of additional accessories, namely a microphone, monitor, video light, handle grip, and perhaps even an external audio recorder or battery.

DSC_3029.JPG

Smallrig 1889 A6500/A6300 Cage and 1970 Wood Grip (sold together as the $55 Smallrig 2097 Kit)
With ¼” threaded mounting points, two NATO-spec rails, a cold shoe mount, and an Arca-Swiss mounting plate built-in, the Smallrig 1889 cage can mount almost everything you would ever want. It is made out of one piece of anodized, machined aluminum with a small laser-etched logo on the left side, so it is fairly lightweight and the finish appears to be quite durable. The one additional feature this camera cage has that most other competitors do not is that this one has two attachment points securing the camera to the cage: the bottom bipod mount and a side screw at the camera strap eyelet, requiring the removal of the stock triangle clip. (A strap loop is cut on the side of the cage as a sling attachment point instead.) This makes the camera much more secure to the cage and very unlikely to loosen without me noticing it.

DSC_3040.JPG

With the cage installed, all the buttons remain completely accessible. The tilting screen, battery / memory card door, and cable connectors are also accessible. As a side benefit to having the camera surrounded by a metal cage, I feel the camera body will be more protected from the occasional bump. Of course, I will continue to be careful with my pricey equipment (and lenses) as always, but accidents are inevitable and this may save my camera from getting too damaged. No one ever plans on dropping or bumping their camera, but I’ve had a few close calls with my Nikon, after all.

DSC_3055.JPG

However, those are not the reasons I bought the camera. I heard about the benefits of a better grip, so of course I picked up the Smallrig 1970 wooden grip to add additional handling surface for my fingers. The wood looks fairly well carved and polished, with a smooth surface and no obvious burrs to snag or splinter. I’m not quite convinced yet on how well the wood complements the look of the Sony’s modern design, but it definitely adds distinction and class.

DSC_3038.JPG

The first time I wrapped my wrapped my fingers around the front of the camera with the wood grip installed, I absolutely fell in love. This is how ergonomic the camera should’ve come from the factory, compact size and light weight be damned. I feel much more secure about handling the body now, inspiring much more confidence and comfort in daily use. While it isn’t absolutely perfect and without flaws, it certainly feels much better than before.

This isn’t the first time discovering how great wood works in the right setting. I really hated wood steering wheels before, mocking them for being too old fashioned. Once I put it in my own MX-5 Miata, I realized it has quite a certain retro appeal.

2019-01-05 002.JPG

Andoer A6000 Camera Cage $35
After having also picked up a used A6000 shortly after buying the Smallrig cage, I wanted to protect and add comfort to it, as well, but I wanted to try something different. At first, I considered a Camvate half cage, but it wouldn’t add a grip. I came across the Andoer on my search, which looks essentially like a knock-off of the Smallrig 1661 at a lower cost (Smallrig’s cage and grip kit 2082 is about $55).

2019-01-05 015.JPG

The Andoer is also made out of one piece of aluminum alloy and anodized, so it is lightweight and appears to be quite solid. It is versatile, featuring ¼” threaded holes and a cold shoe mount for accessory mounting. I opted for the full kit, which includes a black aluminum machined grip and HDMI / USB cable side clamp.

2019-01-05 010.JPG

As a side note: Even though I don’t have a lot of budget to spend, I do my best to not support intellectual theft with my dollars (or yen), buying the “original” whenever possible. But since I have more or less the “original” design cage, I justified buying this one to compare the difference and quality, to see how the older design feels, for the black grip which Smallrig doesn’t offer, and for the included HDMI cable clamp.

Much like the Smallrig cage, the Andoer feels really solid. The black aluminum grip has a great, smooth finish and looks really good on the camera. One minor issue with this design is the shutter button lies really close to the cage, so fat fingers or long nails will hit that edge. All other buttons, battery door, and connectors are readily accessible.

Speaking of connectors, the HDMI connector looks like it’ll work great to add support and protection.

2019-01-05 090.JPG

Comparison
The Andoer cage is more comparable to the older Smallrig 1661 cage, so it lacks the Arca-Swiss baseplate and the two NATO-spec rails. The biggest difference for me is the fact that the Andoer also doesn’t have the additional right side eyelet mount. There is some very minor movement if pressure is applied. As a result, the Smallrig 1889 cage appears to be much more secure.

2019-01-05 067.JPG

The black aluminum grip is more squared off, as it is based on the older Smallrig grip which was less rounded as well. The general finish of the Andoer is not quite as lovely, having a rougher, slightly uneven texture. Some screw holes are not also as cleanly threaded out if you were to nitpick details, but otherwise not quite as noticeable.

2019-01-05 101.JPG

Does it fit?
Just to fulfill my curiosity, I wanted to see if my A6000 would fit in the A6500/A6300 cage and if my A6300 would fit in the A6000 cage and how well each would work, keeping in mind button, switch, battery, and memory card accessibility.

2019-01-05 109.JPG

Surprisingly, both seem reasonably interchangeable. There appear to be no issues with battery doors or connectors on either cage with either camera.

2019-01-05 130.JPG

Does the grip fit?
Since we’re making the comparison, I wanted to see if the Smallrig wood grip would fit in the Andoer cage and if the Andoer aluminum grip would fit on the Smallrig cage. Happy to note that both are interchangeable as well.

2019-01-05 097.JPG

Does the cable clamp fit?
One awesome thing the Andoer came with is the cable clamp, which sold separately by Smallrig goes for $24. That accessory bonus alone makes the price of the Andoer quite well worth the money. Knowing the unlikelihood of me using the A6000 for filming as it lacks 4K and a microphone input, I wanted to know if it would fit on my Smallrig cage. Also glad to know there are no issues.

DSC00108.JPG

Impressions
Over this past winter holiday, I’ve put several weeks of use traveling around Japan with both of these cages, the Andoer mounted to my A6000 and the Smallrig mounted to my A6300. I have used them on occasion with an LED video light and my iPhone as a “budget” monitor, but I don’t have any other accessory necessitating a cage at this time. Therefore, my impressions will be focused on how the cage feels while being used for photography, slung over my neck, and mounted on my Peak Design Capture Clip. My Sony A6000 had the Andoer cage with my lighter Sony 35mm F1.8 prime lens and my Sony A6300 had the Smallrig cage with the heavier, but more versatile, Sony 18-105mm F3.5-F5.6 lens. (Look forward to a further review and comparison on those lenses, as well as a Capture Clip review later.)

When I found myself using the cameras often, I had the cameras on a sling around my neck. I did not find the additional bulk of the cages to be of any issue, since I was already used to a larger, heavier DSLR. The fatter grips made me feel very comfortable holding it and taking photos. My one minor issue is the bottom right metal corner dug a little in my palm after a long day of shooting, so I wish it was a bit rounded off at the edge there. However, it is only a minor concern after a full day and the better overall grip justifies its use.

2019-01-05 142.JPG

Results
The cage makes reaching the focus ring on the prime lens more difficult. If the focus ring is further out like on the other kit lens, then issue is not noticeable. I can see this be an issue for manual prime lens shooters, since many aperture or focus rings are near the lens. The kit pancake 16-50 lens also looks like it will be difficult to manipulate. (This is purely speculation since I don’t have one on hand.)

Another drawback is that both cages make swapping lenses a more difficult affair, since the button is now slightly recessed and my short prime lens was harder to rotate, especially on the A6300. (The mounting ring is much tighter in tolerances than the A6000 is, perhaps as part of the weather-sealing.) This is not a huge issue for me at this time since I have two camera bodies and I don’t plan on swapping lenses often.

My biggest gripe with the Andoer cage turns out to be the aluminum grip. As Sendai is quite cold in winter, the metal was absolutely freezing against my bare, ungloved hands. It became so uncomfortable to use that I ended up putting the A6000 away when I was outside. Definitely not recommended for winter and now that I think about it, in summer, under direct sunlight, it might be too hot to use.

2019-01-05 136.JPG

Conclusion
Both are great but only if you have a need for them, such as the bigger grip or added accessories. They add bulk and weight. Between the two, the Smallrig 1889 cage by far feels better, is more secure with the additional eyelet screw, and offers more mounting options. Cost-wise, the Andoer is a great value that can’t be beat. With the exception of the look of the black grip, I probably wouldn’t buy it again, however. The grip doesn’t feel as nice as the newer Smallrig design, the shutter button is uncomfortable to click, and the fact that it may prove unusable in extreme temperatures makes me reluctant to continue using it.

Update 6/7
Added a few pictures with my Meike flash and some dimensions to the space around the hotshoe.

2019-06-07 004.JPG
2019-06-07 005.JPG
2019-06-07 006.JPG
February 18, 2019 /William Tjipto
SONY, ソニー, 6300, A6300, ALPHA, アルファ, MIRRORLESS, DSLR, DIGITAL, デジタル, CAMERA, カメラ, DIGITALCAMERA, デジタルカメラ, OSS, PHOTOGRAPHY, フォトグラフィー, PHOTO, フォト, PICTURE, 写真, 撮影, NIKON, ニコン, SMALLRIG, ANDOER, カメラケージ, CAGE, CAMERACAGE, MEIKE
Photography, Reviews
12 Comments

Powered by Squarespace